At this article I`d like to introduce Client Side Rendering (CSR) and how to use it on a real life example. Despite the fact that the CSR was introduced together with the SharePoint 2013 and have been making us happy with new UI possibilities for a few years already, it calls out questions. For example, developers are still using custom web parts to make customized list views. Instead of customizing standard SharePoint views with simple JavaScript.
Examples in topic are on typescript.
Introduction:
What is the CSR? It is the client side JavaScript based html render. CSR gets JSON object from the server and renders markup into the DOM object, using internal mechanisms.
Interesting thing is that the new feature of 2013th version “Script Editor” web part works the same way. I`ll describe interesting possibilities of “Script Editor” web part at the next topic.
How CSR customization looks like? It has two events and a structure of render methods:
- OnPreRender
- RenderView
- RenderHeader
- RenderBody
- RenderGroup
- RenderItem
- RenderField
- RenderFooter
- OnPostRender
How you can see from the events named OnPreRender and OnPostRender, those events are raised before and after render respectively. They are usually used for style modifications when full definition of render is not needed. However, the interesting functional is in methods, which names are starting from Render word. There are re-definable functions to render SharePoint list views. The most important thing is that SharePoint standard definition is fully replaced with the custom definition of the method. For example if you redefine the RenderBody method you will not able to call SharePoint definition anymore, as well as child methods for Group, Item and Field. These child methods will return empty string. It means the higher level of customization – the more stuff you have to redefine.
To register your customization you have to call method:
SPClientTemplates.TemplateManager.RegisterTemplateOverrides(options);
This method accepts the object with the following structure:
var options = {
OnPreRender: [(ctx) => { /*prerender action*/  }],
Templates: {
Header: (ctx) => { /*Header HTML string*/return ""; },
Body: (ctx) => { /*Body  HTML string*/return ""; },
View: (ctx) => { /*View HTML string*/return ""; },
Group: (ctx) => { /*Group HTML string*/return ""; },
Item: (ctx) => { /*Item HTML string*/return ""; },
Fields: {
"fieldInternalName": {
"NewForm": (ctx) => { /*new form view HTML string*/return ""; },
"EditForm": (ctx) => { /*edit form view HTML string*/return ""; },
"DisplayForm": (ctx) => { /*display form view HTML string*/return ""; }
}
},
Footer: (ctx) => { /*Footer HTML string*/return ""; }
},
OnPostRender: [(ctx) => { /*postrender action*/ }]
};
All object properties except On…Render events are nullable, and if the value is not passed – then standard SharePoint method will be called.
Contrary to the common opinion that the JSLink is not equal to CSR, SharePoint have options to register custom render script: JSLink, “Script Editor” web part next to View are the safest ways. You can use master page script link, custom action etc. but in this case you need to be sure that the “clienttemplates.js” SOD is loaded.
Let`s look briefly to the JSLink syntax:
- To specify the URL to the script you should use the following tokens:
- ~site – reference to the current SharePoint site (or “Web”)
- ~sitecollection – reference to the current SharePoint site collection (or “Site”)
- ~layouts – version specific reference to the web application Layouts folder (so it will automatically swap out /_layouts/14 or /_layouts/15 for you)
- ~sitecollectionlayouts – reference to the layouts folder in the current site collection (e.g. /sites/team/_layouts/15)
- ~sitelayouts – reference to the layouts folder in the current site (e.g. /sites/teams/subsite/_layouts/15)
- If you need to specify few JavaScript links at the same time than use “|” separator
We have a project, which is a small mail service with possibility to prepare the email content and send it to target audience. This solution contains two lists: “Newsletter” and “Newsletter Contents”.
Newsletter – defines the mail header and the list of recipients. On a main view there should be a possibility to preview email body.
Newsletter Contents – defines the list of containing contents with its own attachments and external references. There could be a few Contents for each “Newsletter”. Content should be created from Newsletter only.
The functionality with email preview and blocking the item creation was developed using the CSR. For those purposes we defined two fields:
<Field ID="{4b5c1676-333a-4bd5-aefb-35e156765972}"
SourceID="<%= sourceid %>"
StaticName="MailexContentsStub"
ShowInNewForm="FALSE"
ShowInEditForm="FALSE"
Name="MailexContentsStub"
JSLink="~sitecollection/SiteAssets/Mailex/field.newsletter.content.js"
DisplayName="Content Preview"
Required="FALSE"
EnforceUniqueValues="FALSE"
Indexed="FALSE"
MaxLength="255"
Group="Blog Mail"
Type="Text"></Field>

<Field
Type="Lookup"
ID="{225bfe7c-6043-4140-aa03-7dd2b17bba13}"
JSLink="~sitecollection/SiteAssets/Mailex/field.newsletterlookup.js"
SourceID="<%= sourceid %>"
StaticName="MailexContToNewsLook"
Name="MailexContToNewsLook"
DisplayName="Newsletter"
Required="TRUE"
EnforceUniqueValues="FALSE"
List="<%= listid %>" WebId="<%= webid %>"
ShowField="Title"
UnlimitedLengthInDocumentLibrary="FALSE"
Group="Blog Mail" ></Field>
As you can see JSLink points to ~sitecollection, this token is replaced with SPSite server relative URL by SharePoint automatically. Please take a look to SourceID, List, WebId attribute values: this syntax is used for auto fill values using the underscore.js template during the deployment time. Underscore.js is quite useful library. With specific tag, you can insert the normal text as well as executable code and html escaped text. More details by link http://underscorejs.org/#template
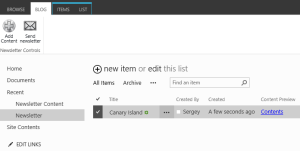
Let’s take a look to real life view:

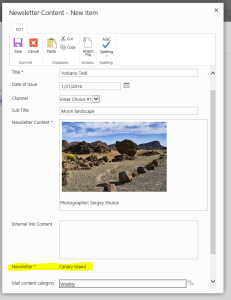
When you chose the single list item, custom ribbon action is activated. On click “Add Content” button, the NewForm modal dialog for Newsletter Content will be opened. NewsletterId of the selected item will be passed to this dialog box via URL. The NewForm contains “Newsletter” field with CSR (you can find xml definition of the field earlier).

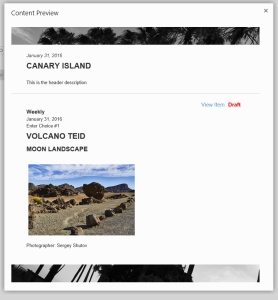
After item creation we return to main view of Newsletter list, and click on Contents link, it is second CSR field. This is a stub field, which is hidden in all forms except display form. On click would be opened modal dialog with email preview:

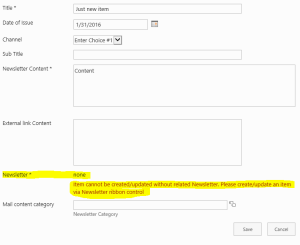
In case if you would like to create new item for newsletter content via standard SharePoint New Item button you will see following error:

Implementation:
So, now I`ll describe how CSR script was created for the Newsletter lookup field. The content preview was made similar way, but was much more simple than this lookup.
How it was developed: I`ve created TS file field.newsletterlookup.ts, which contains all logic around this field modification and validation. Let’s take a look part by part:
- Template registration:
$(document).ready(() => {
SP.SOD.executeFunc("clienttemplates.js", "SPClientTemplates", function () {
SPClientTemplates.TemplateManager.RegisterTemplateOverrides({
Templates: {
Fields: {
'MailexContToNewsLook': {
'EditForm': NewsletterLookupFieldCsr.newsletterNewAndEdit,
'NewForm': NewsletterLookupFieldCsr.newsletterNewAndEdit
}
}
}
});
});
});
This template is simple and we can use the single render template for New and Edit forms. DisplayForm will show the normally rendered lookup field. The template building module has an interface:
export function newsletterNewAndEdit(ctx) : string
The input parameter ctx is the current CSR context generated on server side. Context “ctx” contains information regarding the list, item and rendering methods. Render function returns string value with field value wrapped in html markup. However, we need to do some more operations to make render mechanism working correctly. We need to register validators and define post back functions. So let’s take a look closely:
const formCtx = SPClientTemplates.Utility.GetFormContextForCurrentField(ctx);
if (formCtx == null || formCtx.fieldSchema == null)
return "";
const validators = new SPClientForms.ClientValidation.ValidatorSet();
validators.RegisterValidator(new NewsletterLookupFieldValidator());
formCtx.registerClientValidator(formCtx.fieldName, validators);
formCtx.registerValidationErrorCallback(formCtx.fieldName, newsletterLookupOnError);
formCtx.registerGetValueCallback(formCtx.fieldName, () => {
var el = document.getElementById(readField);
if (typeof el != "undefined" && el != null) {
const lookUpVal =
(<HTMLInputElement>document
.getElementById("inpNewsletterHiddenValue ")).value;
if (!lookUpVal || lookUpVal === "none") {
} else {
return lookUpVal;
}
}
return null;
- Custom validation. We will be using field validator to implement restrictions which won’t allow user to create an item directly from the list:
const validators = new SPClientForms.ClientValidation.ValidatorSet();
validators.RegisterValidator(new NewsletterLookupFieldValidator());
formCtx.registerClientValidator(formCtx.fieldName, validators);
Method RegisterValidator accepts new instance if an object with Validate method. In our case this object is NewsletterLookupFieldValidator:
export class NewsletterLookupFieldValidator {
public Validate() {
let isError = false;
let errorMessage = "";
const el = document.getElementById("inpNewsletterHiddenValue");
if (typeof el != "undefined" && el != null) {
const lookUpVal = (<HTMLInputElement>el).value;
if (!lookUpVal || lookUpVal === "none") {
isError = true;
errorMessage = "Item cannot be created/updated without related Newsletter.
Please create an item via Newsletter ribbon control";
}
} else {
isError = true;
errorMessage = "Html element not found";
}
return new SPClientForms.ClientValidation.ValidationResult(isError, errorMessage);
}
};
As you can see this method returns the ValidationResult object, which later will be passed into the Validation callback. Usually validation method checks the user actions on UI. In our case we will just check if the Newsletter ID is set.
To register Validation Callback, the method which will be called on validation error, you need to call:
formCtx.registerValidationErrorCallback(formCtx.fieldName, newsletterLookupOnError);
Callback method definition is:
function newsletterLookupOnError (error) {
document.getElementById("spnError").innerHTML = `<span
role='alert'>${error.errorMessage}</span>`;
}
This method returns html markup with an error text passed from Validation method to ValidationResult constructor.
The next step is to define Get Value callback. This method gathers value from your custom markup and returns it in SharePoint format. In our case it is lookup value in format “id;#title”.
formCtx.registerGetValueCallback(formCtx.fieldName, () => {
var el = document.getElementById(readField);
if (typeof el != "undefined" && el != null) {
const lookUpVal =
(<HTMLInputElement>document
.getElementById("inpNewsletterHiddenValue ")).value;
if (!lookUpVal || lookUpVal === "none") {
} else {
return lookUpVal;
}
}
return null;
});
After definition of all post render actions, we will be rendering current value for EditForm and for set default value:
let currentValue = "none";
let curDisplayName = "none";
const lookupValues = ctx.CurrentItem["MailexContToNewsLook"];
if (lookupValues != null && lookupValues.length > 0) {
const arr = lookupValues.split(";#");
curDisplayName = arr[1];
currentValue = lookupValues;
}
const html = `<span><span><input type="hidden" id="inpNewsletterHiddenValue" value="${currentValue}"/></span><span class="ms-standardheader" id="spanNewsletterValue">${curDisplayName}</span><br/><div id="spnError" class="ms-formvalidation ms-csrformvalidation"></div></span>`;
In case of a NewForm we have to check if there is Newsletter ID passed via URL from “Add Content” custom ribbon action.
if (lookupValues == null || lookupValues.length === 0) {
const regex = new RegExp(`[\?&]newsletterId=([^&#]*)`);
let curId = regex.exec(location.search);
curId = (curId === null ? null : decodeURIComponent(curId[1].replace(/\+/g, " ")));
if (curId != null && curId.length !== 0) {
retrieveNewData("inpNewsletterHiddenValue", , curId);
var clientContext = new SP.ClientContext();
var targetList = clientContext.get_web().get_lists().getByTitle("Newsletter");
var targetListItem = targetList.getItemById(curId);
clientContext.load(targetListItem);
clientContext.executeQueryAsync(() => {
$(`#inpNewsletterHiddenValue`)
.val(targetListItem.get_id()+";#"+ targetListItem.get_item("Title"));
$(`#spanNewsletterValue`).text(targetListItem.get_item("Title"));
}, () => {
console.log("Data retrieve failed");
});
}

}
If the field doesn`t have any value, or “newsletterID” have not been passed via url, then the “none” text would be rendered. The value for hidden input inpNewsletterHiddenValue will be set “none” as well. Now when you click Save button, a method Validation will raise an error with text: “Item cannot be created/updated without related Newsletter. Please create an item via Newsletter ribbon control” and Validation will not be passed.
I`ve mentioned two customized fields at the beginning, but the second field is quite simple. There is no validators and “get value” postback. There is only Link markup generator, but under the hood, there are some actions to retrieve list items data and render it into html using underscore.js.
Conclusion:
To summarize the topic values I`d say CSR it is the very flexible and powerful tool and a kind of official Microsoft hack for SharePoint UI. Now you are able to:
- Customize views without involving the SharePoint Designer.
- Create dependent fields
- Customize validation
- Change standard controls to something interesting like a progress bar or slider
All these operations are compatible with SharePoint online and On-premise.
In next topic I`ll describe some interesting features with Script Editor web part.


Leave a comment