Another SharePoint project to do? You’ve prepared the whole code and all assets. Now it’s time to deploy everything to a few tenants or sites. You’ve created all lists and groups, installed all client-side solutions, added some permissions. Everything has been done quickly with CSOM, REST or JSOM. But there is one thing we have to do manually as there is no API (yet) to do it automatically. It is an entirely new and powerful tool – MS Flow. In this article, I’ll show you how you can improve your provisioning process.
Before we start with technical stuff, take a look at the following two use cases:
- You have to create a few flows in multiple environments. Let’s say you’ve got three tenants: development, test and production. Your task is to generate five flows with a different level of complexity. You don’t want to export and import them manually.
- You’ve been asked to add flows for over twenty lists. They will do the same actions for all SharePoint lists. As you can assume, the only difference in definition will be the list name and site URL. This case calls for some automatization.
Create a flow
So how would it work? You need to create a new flow triggered with an HTTP request. In the body of this request, you’ll pass a flow definition which will be used to generate a flow. Let’s do it step by step.
Create a flow and add a trigger. Take a search for ‘When a HTTP request is received’. Now it’s time to provide a body schema. The easiest way is to use a sample payload. You can type it literally this way:
{
"flowName": "some name",
"flowJson": "imagine I'm JSON"
}
The schema is generated. Create a new step and look for ‘Get Flow’ action. In this action select your environment and any existing flow. You have to create at least one action before you’ll be able to save your work. Give your flow a name and save it. I’ve named it ‘FlowProvisioner’. Then go back to your ‘Get Flow’ action and change the selected flow to your flow.
In the next step, you’ll use ‘connectionReference’ which is returned by ‘Get Flow’ action. This variable is necessary to establish a connection from the created flow. You can find your own way of its implementation but the approach I’ve just presented seems to be the best for the purpose of this blog.
The next action will be ‘Compose’. Click on the ‘Inputs’ text field and open ‘Expression’ tab in the pop-up. Type this expression:
json(triggerBody()['flowJson'])
It will convert your input string to a proper JSON object. Let’s use it in the next step. Find a ‘Create Flow’ step. Select your environment and flow state manually. Chose your input data from dynamic content to fill flow display name and then output from the previous step to fill flow definition field.
In the last section click on the small icon to switch to array input mode. From dynamic content select ‘connectionReference’ from ‘Get Flow’ step.
It’s all set. Your flow should work now, but I’d suggest you spend a few more minutes adding some responses and exception handling.
Flow responses
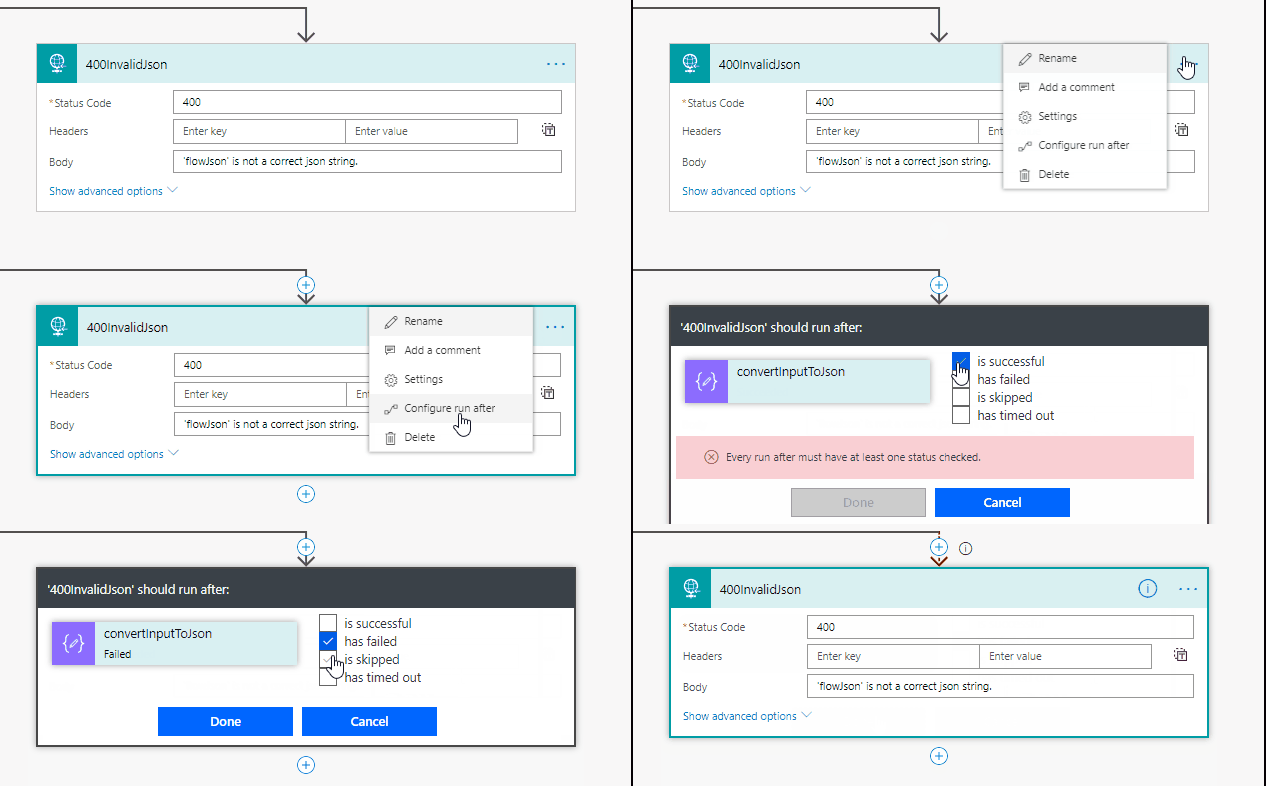
Between a ‘Create Flow’ action and ‘Compose’ use a plus icon to add a parallel branch. Find a ‘Response’ action and fill it with data. I’d suggest setting the status code to 400 (Bad request). In the body, you can put your message i.e. ‘flowJson is not a correct json string’. Then click on the three dots icon in the top right corner and ‘configure run after’ to run only if the previous action failed.
Create a similar action after ‘Create Flow’ but in this case, it’s good to put some additional data in the body. From the dynamic content pop-up select body of the previous step. There you’ll find information about the reason of the action failure.
It’d be nice to send also a success message. Create a parallel branch after ‘Create Flow’ and add ‘Response’ action. You can put a body of the previous step as a body of the response. There is some necessary information about a flow like display name or id. Set the status code to 201 (Created). Flow is ready to use.
How to use it?
First of all, we need to get a flow definition. Export a flow which you want to deploy and unzip a file. Open folder \Microsoft.Flow\flows\<your-flow-guid> and open definition.json. Then, copy only a ‘definition’ property value from the file. It should contain triggers, output and actions data. There is also metadata which isn’t necessary. Escape all special characters and then you can use a flow definition in your request.
If you format this JSON, you’ll notice it’s very readable. For instance, let’s take a look at ‘When an item is created’ trigger. In the property ‘inputs’ there is a property path.
“path”:”/datasets/@{encodeURIComponent( encodeURIComponent(‘<your-tenant>/sites/<your-site-name>‘))}/tables/@{encodeURIComponent( encodeURIComponent(‘40182f33-da1f-48f3-a4d9-971e89338f5e‘))}/onnewitems”
Here is the site URL as well as the list GUID. You can make an application which will replace those strings and generate few similar flows for different SharePoint lists and sites.
The solution described is a perfect instrument for creating few almost exact flows. It is also useful when you want to migrate some flows from one environment to another. In the next blog post, I’ll show you how to create a simple flow to get data flow definition as a JSON. It’ll make the flow transfer even more convenient.
I think this article gives you a solid base to create more complex flows and solutions. If you take time for flow definition analysis, you’ll undoubtedly find patterns, and you’ll be able to develop flows more dynamically.


Leave a comment