Imagine this situation. We are designing a system for a bank using a microservices architecture, where services communicate synchronously and asynchronously. Its task is to allow users to create credit cards and debit them. The system is ready, and each service has been tested in isolation. But to better reflect real conditions, we would also like to test the entire system and flow.
How can we do this? What challenges will we face during the implementation of such a test?
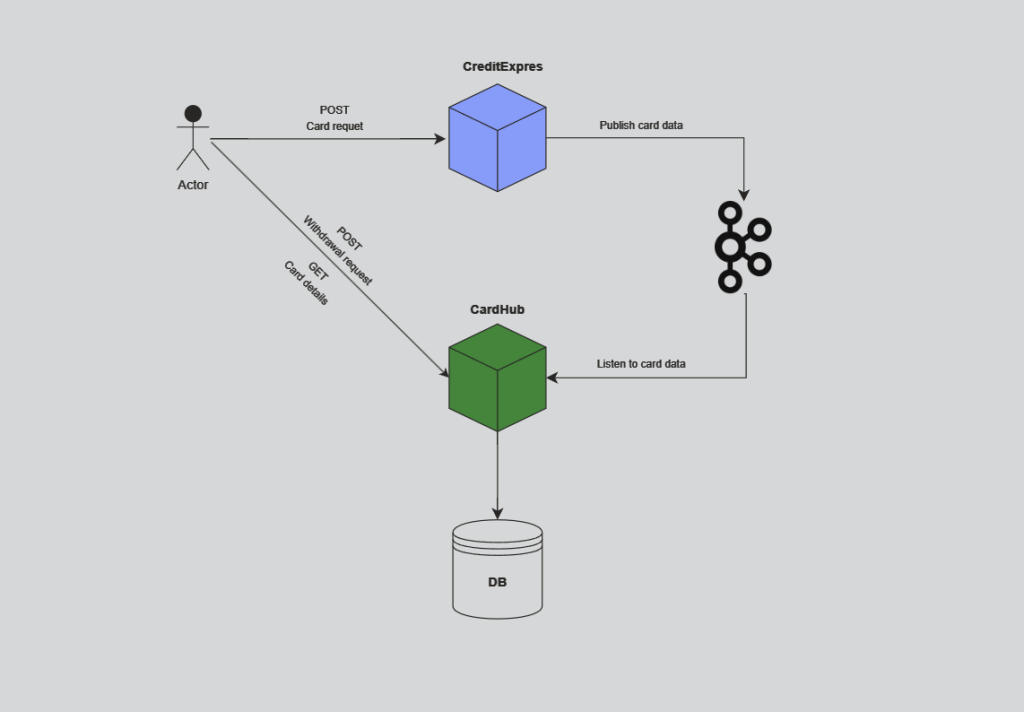
Before we delve into discussing tools for creating such a test, let’s take a look at the architecture below and consider the challenges it presents to us:

Here’s a breakdown of the test steps: the client initiates a request to create a card in the CreditExpress service. Card creation data is stored in Kafka to ensure high throughput and availability. The CardHub service, in turn, listens to Kafka events, validating the card creation and enabling the retrieval of its data along with the card load.
As we can see, the flow described above involves two services that communicate asynchronously.
Assuming both services are tested within their boundaries and in isolation, the question arises:
- How can we test the entire system flow?
- How can we verify if the services exchanged data correctly?
- How do you synchronize the environment to accommodate the asynchronous nature of the system?
The solution to these problems is to create a project combining the Awaitility library with Cucumber, which implements the BDD approach. Let’s briefly introduce them before we move on to implementing the test.
Awaitility
Awaitility operates as a comprehensive testing library meticulously crafted to address the challenges inherent in the asynchronous programming paradigm. At its core, it seamlessly integrates with Java’s asynchronous constructs, providing developers with a robust suite of tools to validate their asynchronous code’s reliability, performance, and resilience.
The fundamental premise of Awaitility revolves around its ability to manage and synchronize asynchronous operations effortlessly. Unlike conventional testing libraries, Awaitility introduces a novel approach to handling asynchronous tasks by orchestrating a systematic and controlled waiting mechanism. This waiting mechanism allows developers to await the completion of asynchronous tasks without resorting to arbitrary timeouts or cumbersome manual interventions.
Simple example:

Furthermore, Awaitility introduces a declarative and expressive syntax, simplifying the process of crafting assertions for asynchronous outcomes. By encapsulating the complexities of asynchronous testing, Awaitility enables developers to articulate their expectations with clarity and conciseness, thereby enhancing the maintainability and readability of test suites.
As we can see, the test ensures that the asynchronous order processing completes within a specified timeframe (10 seconds in this case) using Awaitility. The OrderProcessor class simulates an asynchronous operation that takes 3 seconds to process the order. Once the order processing is complete, the test verifies the operation’s success.
If, however, we modified the processOrderAsync method and put the thread to sleep for a duration longer than the one specified in Awaitility, our test would fail with the following message:

So, we can see how flexible the Awaitility library’s syntax is, offering a concise and functional expression.
Behavior-Driven Development
Moving forward, one of the scenarios where Awaitility can find its great application is BDD tests that use Cucumber. It is a testing approach that employs natural language scenarios to describe and validate the expected behavior of a system. It involves describing system behavior using plain language scenarios.
These scenarios, written in a format called Gherkin, outline specific actions and expected outcomes. The scenarios are executable specifications and translated into code through step definitions. These step definitions define the implementation of each step in the scenario using a programming language like Java.
Testing such specific system behaviors often involves tackling the asynchronous components of the system, particularly in cases where the system is distributed and the execution of a single scenario is spread across multiple services. In such situations, Awaitility provides an elegant solution for effectively managing the wait time for the successful completion of each step in a test scenario.
Project setup
A fresh Java project was created based on two fundamental assumptions to test the previously described example. The system is tested exclusively in a manner that can be used in a production environment, meaning solely through the provided API.
The second principle guiding this project is to be as domain-agnostic as possible, having only the essential dependencies required for conducting the test. As a result, the project stands free from any dependencies tied to the system. This resulted in the following dependencies:
<dependencies>
   <dependency>
       <groupId>io.cucumber</groupId>
       <artifactId>cucumber-java</artifactId>
       <version>6.11.0</version>
       <scope>test</scope>
   </dependency>
   <dependency>
       <groupId>io.cucumber</groupId>
       <artifactId>cucumber-junit</artifactId>
       <version>6.11.0</version>
       <scope>test</scope>
   </dependency>
   <dependency>
       <groupId>com.squareup.okhttp3</groupId>
       <artifactId>okhttp</artifactId>
       <version>4.9.1</version>
   </dependency>
   <dependency>
       <groupId>org.awaitility</groupId>
       <artifactId>awaitility</artifactId>
       <version>4.1.0</version>
       <scope>test</scope>
   </dependency>
   <dependency>
       <groupId>com.fasterxml.jackson.core</groupId>
       <artifactId>jackson-databind</artifactId>
       <version>2.12.3</version>
   </dependency>
   <dependency>
       <groupId>junit</groupId>
       <artifactId>junit</artifactId>
       <version>4.12</version>
       <scope>test</scope>
   </dependency>
   <dependency>
       <groupId>org.assertj</groupId>
       <artifactId>assertj-core</artifactId>
       <version>3.21.0</version>
       <scope>test</scope>
   </dependency>
</dependencies>
As we can see – we’re relying on:
- the Cucumber library for crafting BDD tests,
- the lightweight Http client OkHttp,
- the Awaitility library to handle the asynchronous part,
- Jackson will be able to handle JSON format easily.
Scenario setup
To get started, we need to create a test scenario. To do this, we create a file with the .feature extension, characteristic of the Cucumber library. In our case, it will be Card.feature, containing a description of the scenario we are testing.

As we can see, IntelliJ has already recognized the Cucumber file and identified it as an executable test. It’s worth remembering to have the Gherkin plugin installed (Cucumber dialect). This way, IntelliJ will easily recognize its files and provide suggestions, such as correct syntax. This file encapsulates the business essence of our test, specifying the initial conditions and the system’s expected behavior during a given action.
The beauty of this approach lies in separating concerns from the business layer, allowing us to focus solely on understanding the business value and implementing it in the following steps.
During the execution of this Cucumber test, Cucumber will start scanning our project for Given, When, and Then blocks with the same description as provided in the above file. It will execute them in that exact order.
However, for this process to work, we still need a Runner class that fulfills the above responsibility and allows adding options such as nicely printing the results. To achieve this, we add the following class to the project:

We also added the @CucumberOptions annotation. It is an annotation to configure various runtime options for your Cucumber tests. It’s like a control panel where you can specify things such as the location of your feature files, the packages or classes containing step definitions, which scenarios to run based on tags, and even the format of your test reports. It’s a handy tool to tweak the settings for your Cucumber test environment.
After completing the above steps, we can proceed to implement the mentioned scenario steps. To do this, let’s create a package named “scenarios” with a ValidCardApplicationScenario class.
So, the entire project structure should look like this:

Scenario implementation
Let’s kick off implementing our test by creating three fields in the class. We’ll initialize the HTTP client and ObjectMapper right away. The field containing the Card number will be initialized in subsequent steps.

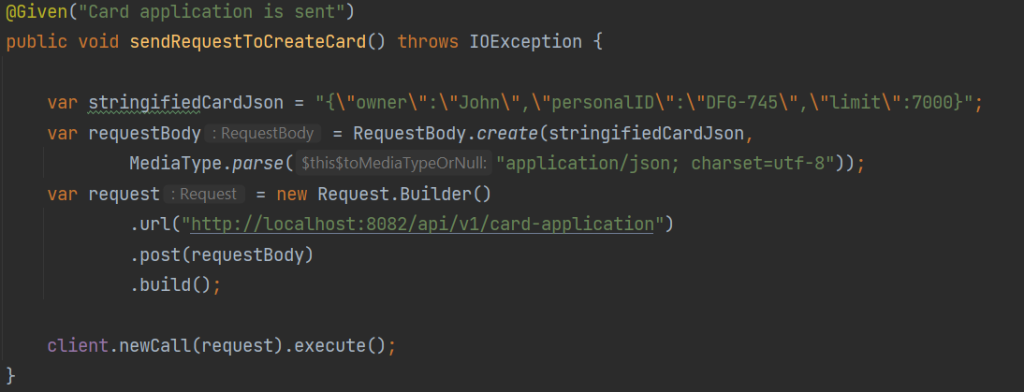
In the next step, let’s implement the Given step. As mentioned at the beginning, the project is intended to be as system-agnostic as possible. Therefore, we represent the necessary objects using the JSON format.
We’ll build an object representing a client who wants to create a card with a specified limit and personal ID. Then, we connect to our system’s first available entry point – CreditExpress.

Now, we can move on to implementing the next step – the When block, where we’ll handle the asynchronous part of our system using Awaitility.
Currently, the system is processing our request, and we need to synchronize our subsequent test steps to reflect the real situation in which the client waits for the system to process their request. To achieve this, we’ll use another endpoint the system provides, querying it for details of our newly requested card.
If the card successfully passes validation and is activated, this endpoint should return the cardholder’s details based on their personal ID. However, we want to refrain from continuously sending HTTP requests to conserve resources and better simulate real interactions with the system.
To achieve this, we use Awaitility, where we can easily specify how long we want to wait until we consider the test unsuccessful. We also defined what we wanted to do during this time and with what frequency. In our case, we wait a maximum of 10 seconds and try to read information from the previously mentioned endpoint every second until the response is successful.

Once we have the system’s response, we can retrieve the newly created card’s code and immediately use it in the most critical part of the test.
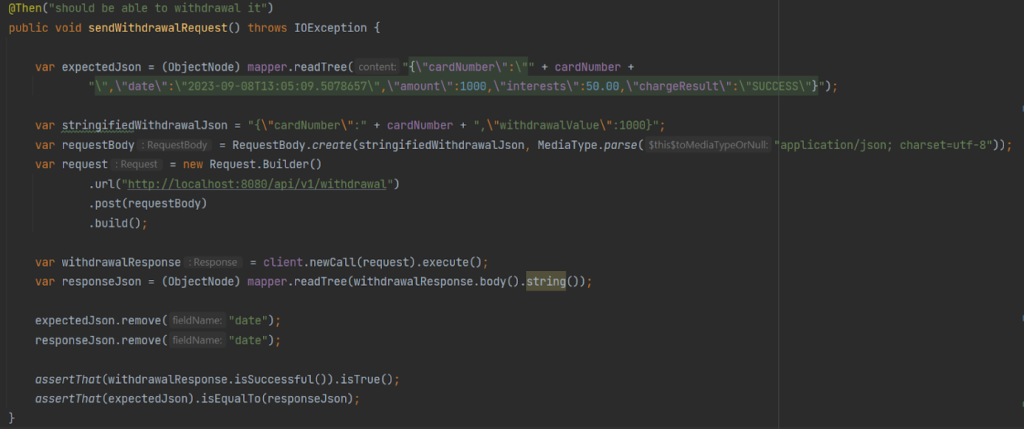
At this point, we already know that our request has been successfully processed, and the card has been created and is active in the system. Now, we can perform the most crucial part of the test, checking if we can load such a card. After consulting with the business, let’s assume we have prepared an object that we should expect as a result of loading the card – store this object in a local variable named expectedJson.
Next, having the card number from the previous step, we can build a request object to load our card with the specified value. In the following step, we send our request and check if the system’s response is what we expect.

The only challenge we need to address is the date issue. The date sent in the response after loading the card will always differ from the expected date. Several options exist for solving such an assertion, such as using a different type of assertion or employing regular expressions. In this case, for simplicity, it was decided to remove these two fields and compare the rest, the crucial part of the object.
Summary
In the article, we delved into how we can test our systems as a cohesive living organism. We explored methods for testing the integration between different system elements, considering the often asynchronous nature of their communication. We tested the system as a black box, utilizing only the endpoints provided by it.
This approach allowed us to mirror the real conditions in which the system operates when end users use it, not just developers and testers.


Leave a comment