In today’s world of distributed web systems, maintaining a balance between the backend and frontend often becomes a challenge that is not easily met. When working with separate layers, developers often face problems related to synchronization, communication, and scalability problems. Fortunately, there is a unique solution on the horizon – Hilla.
In this article, we will discover how Hilla facilitates seamless communication between the backend and frontend layers while ensuring efficiency. We will then focus on form validation, showing how Hilla makes the process simpler, safer, and more efficient.

What is Hilla?
Hilla is an innovative framework created by the Vaadin team. It combines the Spring Boot tool and the React library. It offers efficient and easy integration and solves the problem of maintaining separate backend and frontend layers. It also provides convenience and efficiency in the web application development process.
Hilla project structure
To start working with Hilla, we need to have NodeJS installed on our computer and the npm command line interface (npx has already been installed in npm since the 5.2.0 version).
To start working with Hilla, a project must be created. Below is the command that will make this possible:
npx @hilla/cli init hilla-blog
Here’s what the directory structure looks like after the project is generated:

- Frontend (React)
- frontend/components – a directory containing React components that are the building blocks of the user interface. Visual and functional elements such as buttons, forms, or tabs are included here.
- frontend/themes – a directory dedicated to graphic styles and themes. It contains files about style sheets, color settings, and fonts, allowing you to easily manage your application’s appearance.
- frontend/util – a directory with tools and auxiliary functions that can be used in various places in the project. It contains general-purpose functions that make manipulating data or performing certain operations easier.
- frontend/views – a directory with views, that is, the main structures of pages in the application. Here are the files responsible for rendering specific sections of the user interface.
- Backend (Spring Boot)
- src/main/java/com/example/application – server-side source directory contains the server-side Java views. It contains the file Applicaiton.java, which is a server entry point.
This project structure makes it easier to navigate and organizes the code to support both front-end and back-end development. By separating the “frontend” and “src” directories,” the Hilla allows you to focus on working efficiently on both layers of the application.
How does the Hilla work?
Hilla allows Java methods to be called from within TypeScript. A key element of this functionality is the @BrowserCallable annotation. All public methods in a class marked with this annotation become accessible and callable on the frontend side. When running the project, Hilla generates TypeScript equivalents of the data structures used in the class marked with the @BrowserCallable annotation. In addition, it creates an equivalent of this class, allowing smooth and seamless use of these methods on the frontend side.
Demonstration of Hilla operation using the project as an example
Backend layer
For this article, I will prepare a backend layer consisting of an entity, repository, dto, mapper, and service to demonstrate the operation of the Hilla framework.
- Entity:

- Repository:

- DTO:

- Mapper (I will use the MapStruct tool):

- Service:

I added two methods to the service:
- findAll() – which will be used to search for all Car records,
- create(CarDTO carDTO) – which will be used to create a new Car record.
In the service, I used the @BrowserCallable method to allow methods to be called from the React application. In addition, I used the @AnonymousAllowed annotation to disable the access control that Hilla provides (I don’t recommend doing this on the app—I’m only doing it for this article). I also used the @Nonnull annotation. The TypeScript generator uses it as a source of type nullness information.
Non-nullable types are mandatory, requiring values, while nullable types are optional, allowing for the absence of a value. By default, Java rules dictate the mapping and generation of types:
- Primitive types like ‘float’ are non-nullable.
- Reference types such as ‘String’ or ‘Float’ are nullable.
- Collections accept null unless the item type is primitive.
- Maps accept null unless the item type is primitive.
To convert nullable types to non-nullable, you can apply the @Nonnull annotation. The Hilla developers decided to add this annotation because the existing `jakarta.annotation.Nonnull` annotation does not apply to type parameters.
As part of the project, I will use the H2 database created in the application’s memory at startup. I will also add test data to display it on the frontend side.

Frontend layer
The next step is to launch the project, allowing Hilla to automatically generate files ready for use on the frontend side.
Here is what the structure of the generated files looks like after the project is launched:

CarDTO.ts reflects the structure of the CarDTO.java file, which was previously defined on the backend side.

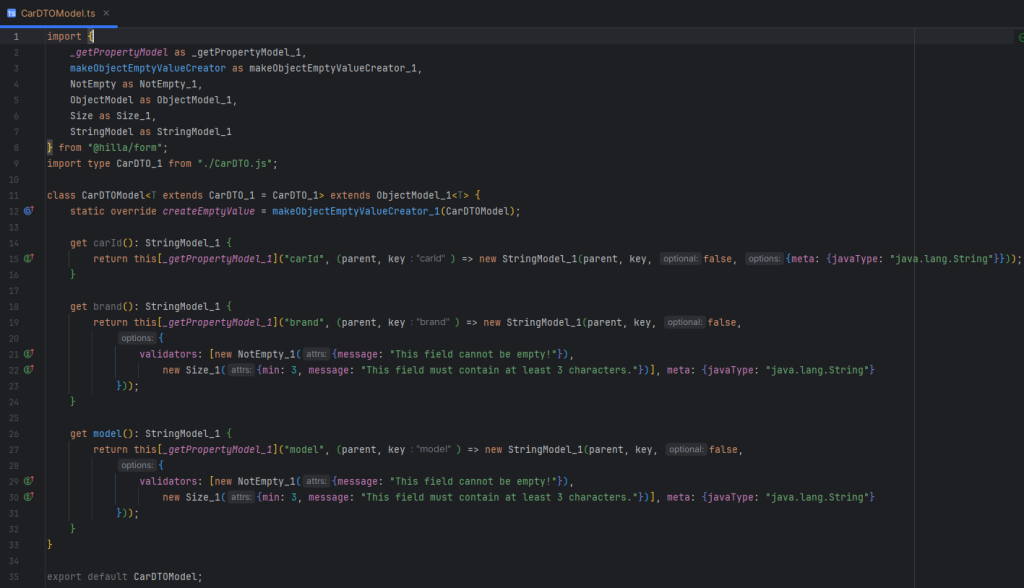
PlikThe CarDTOModel.ts file contains field definitions and validation rules assigned to individual fields in the DTO for the Car object.

The CarService.ts file references the CarService.java class, containing declarations of the various methods defined in that class.

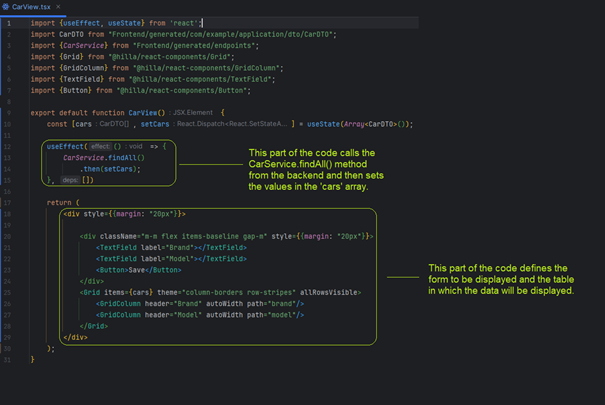
With such a set of generated files, I proceeded to create a CarView.ts view in which I will add a form consisting of two text fields and a button to allow adding new records. Below the form, I will add a table to display the data.
After launching the project, we can see the application’s appearance. Our view and the pull-out menu on the left have been generated. Hilla defaults to adding such a menu in the MainLayout.tsx file when generating the project using the AppLayout component. It is freely configurable.

Data validation
Data validation is about preventing errors and effectively managing situations when data does not meet expected criteria. This subsection will explore error-handling techniques related to validation in the Hilla Framework.
Hilla simplifies validating user input by leveraging the backend Java data model. Interpreting the Bean Validation (JSR-380) annotations on your Java data types seamlessly enforces these constraints on the incoming user input.
Let’s add validation annotations to our fields in the CarDTO.java file. Let’s assume that the “brand” and “model” fields cannot be empty and must contain at least 3 characters. I will use the @NotEmpty and @Size annotations for this.

Next, I run the project. Let’s take a look at what the CarDTOModel.ts file looks like. It contains the same validation rules I posted on the backend side in the CarDTO.java file.
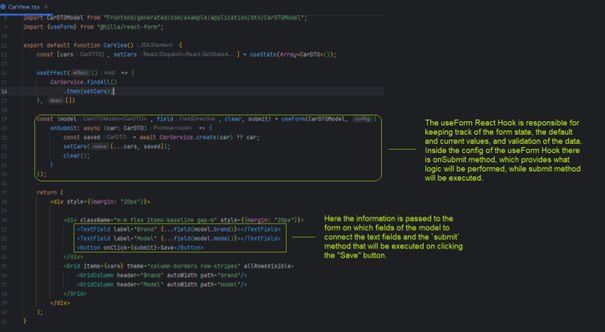
Now, I can plug the validation into our form in the CarView.ts file.
When the submit method is executed, the CarService.create(car) method is executed, which calls a method written on the backend in CarService.java. It receives the created object as a response and adds the newly created object to the “cars” object array. Finally, the form is cleared using the clear() method.
Let’s see how the application works
When you try to press the “Save” button with uncompleted fields in the form, you get information under specific fields as to what validation rules worked.
In this example, the text fields “Brand” and “Model” are empty, so the validation I wrote on the backend side using the @NotEmpty annotation worked.

Now, I will try typing in two-character inputs to test the performance of the second validation. As you can see in the attached image below, the second validation I added to the backend using the @Size annotation worked.

I will then try to enter data that meets two validation conditions. The form observed the data change to valid and allows you to save it.

After pressing the “Save” button, we can observe the correct addition of our data to the results table.

Example of ready-to-use component
Hilla meets the demands of web application development and provides ready-made components. I will present the operation of the Auto Grid component. It supports sorting and filtering functionalities and retrieves data from the backend using lazy loading. This is achieved by invoking the ListService<T>.list(Pageable pageable, @Nullable Filter filter) method.
To begin with, we need to customize the backend. I’m adding a JpaSpecificationExecutor interface to the repository to enable specific database queries.

I will add an extension to CarService. It will extend the dedicated class (ListRepositoryService<T, ID, R>, which in turn implements the ListService<T>) that Hilla provides for the operation of the Auto Grid component.

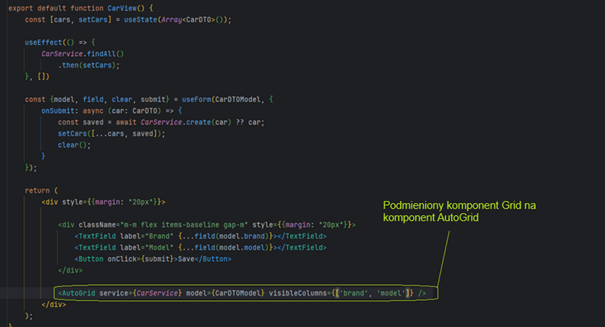
On the frontend side, we can replace our Grid component, with an AutoGrid component, which will take the TypeScript equivalent of our service on the backend and the CarDTO model in the parameters.
After launching the application, we can see what it looks like.
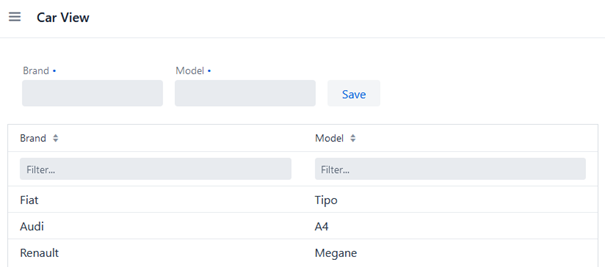
We can sort and filter values. Let’s see how sorting works.
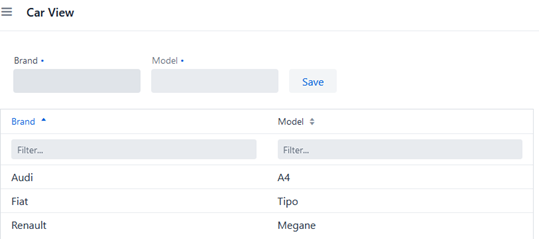
We can see that the values have been sorted by Brand field. Let’s try to filter out the Model values.
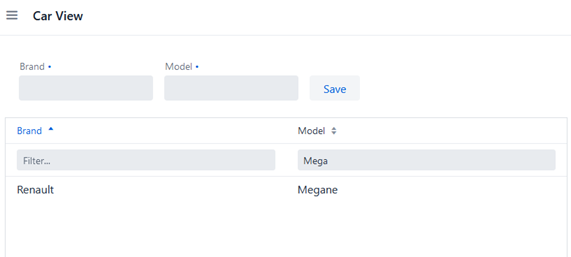
The values of the Model field were filtered out correctly. I hope I have shown that Hilla has a wide range of solutions, but I have only shown one of the many components available.
Configuration and deployment
In the Hilla project, the frontend and backend can be configured. To configure the frontend, we can use the tsconfig.json file, which configures the TypeScript compiler. For backend configuration, we can use a pom.xml file, which adds dependencies and manages production builds of our application.
If we would like to generate a production build, we just need to run the command:
mvn clean package -Pproduction
Executing this command will build a JAR file with all dependencies and frontend resources ready for deployment.Hilla documentation provides ready-made deployment instructions for top cloud providers (i.e., AWS, Azure, Google Cloud, and Heroku).
Summary
In this blog post, I tried to illuminate the fascinating world of the Hilla framework, showing its unique advantages and potential in the rapid development of full-stack applications. I hope I conveyed how we can easily use this tool to integrate frontend and backend layers effectively, creating consistent and efficient web applications.
Hilla simplifies the application development process and shortens the path to full functionality. I emphasize that Hilla offers a wide range of ready-made components, thus streamlining the process of building a user interface. In addition, the framework provides extensive security implementations, making it easy to take care of application security.
Since Hilla is an open-source project, I encourage you to participate, where you can expand your skills and make history. The project’s official website has documentation and a full range of available components and tools that will make application development even more efficient and enjoyable.


Leave a comment