There are couple of existing ways how to authenticate one app to another when you create a distributed system. You can write your own identity service and use it across your apps.
But here Azure Active Directory comes with its great features I personally love. In this post, I will show you how to configure one of those flows.
User wants to fetch its data
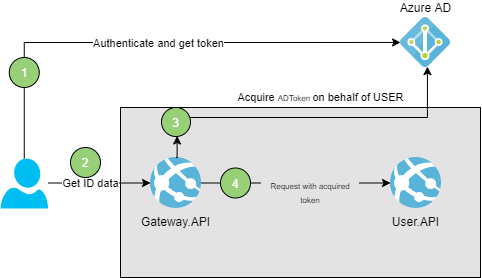
Let’s assume we have a gateway service called Gateway.API and user service called User.API which preserves user data. We assume that nobody but user itself can access its data. But how User.API will know that the Gatway.API is requesting it in the name of the User? Here OAuth2.0 On Behalf flow comes to the rescue.
The main idea is to propagate user identity and its permissions to another element in a chain – to service which is requested by service requested by user. In this way we can easily configure access to specific resources thanks to AD.
Full code sample I used in this blog post you can find on my Github
OAuth 2.0
What OAuth 2.0 is and how exactly it works you can read on its official website. But let me give you a short introduction. OAuth2.0 is an authorization (not authentication) protocol. Basic idea is that client (application requesting access) asks Resource Owner to for authorization. Resource Owner grants authorization and in the next step client with authorization granted goes to the Authorization Server which returns access token to the client. Finally, our client can access requested resource.
On Behalf
On Behalf flow means that application accessed by the user gains access to another resource on behalf of a user and all actions performed there are authorized with user token.
How to configure Azure Active Directory on Behalf flow?
Configuration of Azure Active Directory is quite simple. Basically, Azure AD already exists on our Azure account. To register a new app which will be using it we have to go to “App Registrations” and click “New registration”. Then you should see the following screen.
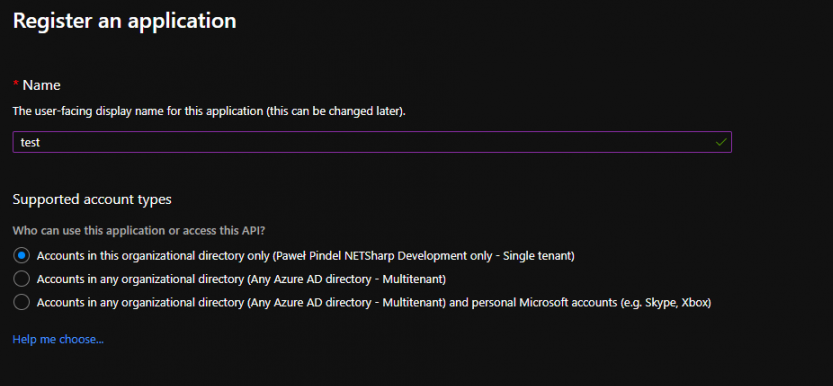
In the Name field we might type whatever we want to correctly identify the app. More important are next two sections.
- Supported account types – tells the AD if we want to allow to login only users from our tenant (company) or also grant access to other tenants / personal accounts. I want my app to be used only in my company so I will go for the first option. Meaning, only people with users created for this tenant will be able to login. They don’t have to be in the same domain name like @netsharpdev.com. Users you can define in section called Users within Azure Active Directory section.
- Redirect URI – this is optional option, but if we want to authorize with impersonate flow, we need to setup a redirect url. It is an url of our app where we have an endpoint for authentication. If we use OpenIdConnect it is by default /signin-oidc, but can be overwritten in Startup.cs. However in this case it is not needed because we authorize with bearer token claimed from Azure AD.
Configure Access
I have created one more app registration called test-client. It represents the client app which is meant to authenticate to test on behalf of authorized user.
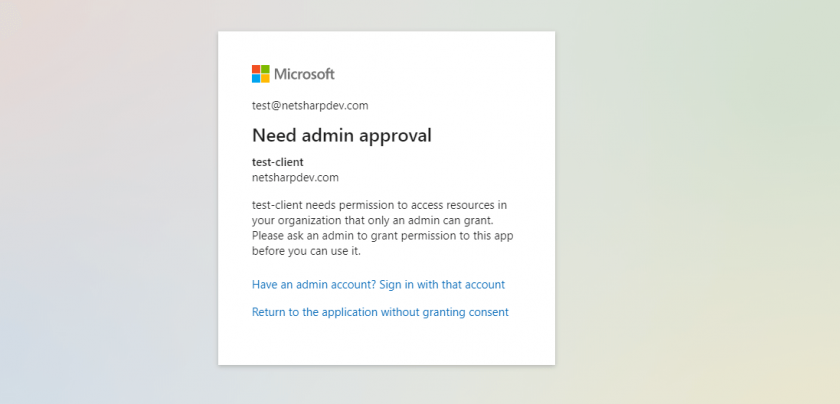
If you want to grant test-client access to test you have to do two steps. First of all, in test app registration you must create scope. You can have multiple scopes and decide on code level which scope gives access to which part of the app. I am going to create Weather.Read scope. I also selected that only Admin can grant consent, meaning that if anyone in the Azure AD will try to login to our test app and application will ask user for permission he will not be able to consent since he need an approval from Administrator and he will see this message.
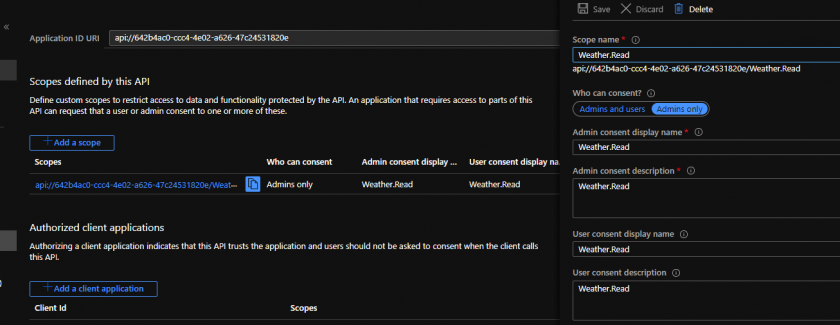
Below you can see the view from Azure portal when I was creating scope for my app.
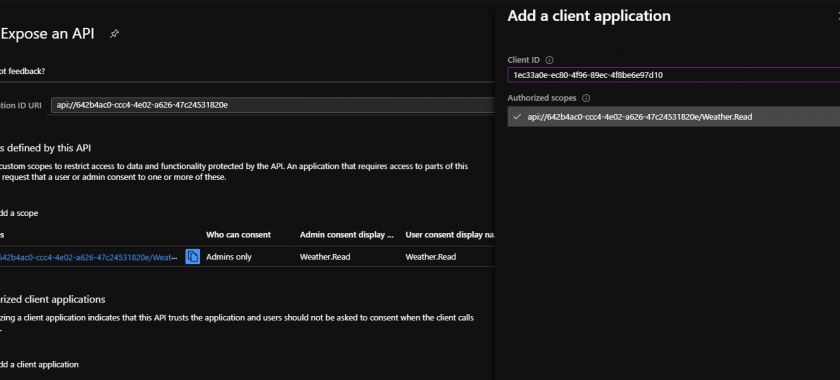
In the second step, we must grant our client app access to specific scopes. That way user won’t be asked to grant a consent for that app.
How to implement on Behalf flow in .NET Core 3.1?
Currently, there is a library under development and still in prelease version written by Microsoft community to make it easier, but creating production apps we want to have stable implementation. However, I will use some of the extensions provided by this preview to avoid implementing complex solutions while the problem has already been solved. Stable version is expected to be released by the end of the year 2020.
Let start with proper setup in appsettings.json. Here, we need to provide Azure AD instance which is by default https://login.microsoftonline.com/. Domain and TenantId can be found in Active Directory overview. ClientId which is the id of our app registration. It binds our app with specific app registration.
appsettings.json
{
"AzureAd": {
"Instance": "https://login.microsoftonline.com/",
"Domain": "netsharpdev.com",
"TenantId": "80c55bf4-64c0-4b58-965e-f2398ba61766",
"ClientId": "642b4ac0-ccc4-4e02-a626-47c24531820e"
},
Next, all you have to do in your Web API startup is the following line of code, which is adding Azure Active Directory bearer authorization into your app.
Startup.cs
services.AddMicrosoftWebApiAuthentication(Configuration);
Securing App with Scope filtering
Let’s assume we want our endpoint to prevent from accessing the users which do not have required scope within token. Same validation we should provide on issuer and audience to make sure we let in only authorized users. Here is the simple example of how to verify scope during processing request. We could also delegate this to attribute but for example purpose I left it in controller’s action.
[HttpGet]
publicIActionResultGet()
{
HttpContext.VerifyUserHasAnyAcceptedScope(scope);
var
rng=newRandom();
returnOk(
Enumerable.Range(1,5)
.Select(
index=>newWeatherForecast

Date=DateTime.Now.AddDays(index),
TemperatureC=rng.Next(-20,55),
Summary=Summaries[rng.Next(Summaries.Length)]
})
.ToArray());
}
Web Client Application
Last step is to configure our web client which is going to use OIDC (OpenIdConnect) and OAuth 2.0 flow. With latest library provided by Microsoft community it is super easy. All we have to do is to use following methods in startup.
Using statements
using Microsoft.Identity.Web;
using Microsoft.Identity.Web.TokenCacheProviders.InMemory;
We should specify list of scopes application should be granted. You can use multiple scopes from multiple app registrations, always use clientId of resource you want to get scope.
Services configuration
services.AddMicrosoftWebAppAuthentication(Configuration)
.AddMicrosoftWebAppCallsWebApi(Configuration,newList<string>(){"api://642b4ac0-ccc4-4e02-a626-47c24531820e/Weather.Read"})
;.AddInMemoryTokenCaches();
This registrations mean I am going to use OpenIdConnect with Azure AD Bearer scheme, tell my app to use MSAL and store Active Directory token in memory.
Here is a small sample request made by my app. TokenAcquisition is an interface implemented within the Microsoft.Identity.Web library and it loads for us token from cache granted for defined scopes. That is how we can authorize to our Web API.
public asyncTaskRequestUserDataOnBehalfOfAuthenticatedUser(HttpContextcontext)
{
var
scopes=newList<string>{$"api://642b4ac0-ccc4-4e02-a626-47c24531820e/Weather.Read"};
try
{
var
token=await_tokenAcquisition.GetAccessTokenForUserAsync(scopes);
var
httpClient=new HttpClient();

var
defaultRequestHeaders=httpClient.DefaultRequestHeaders;
if(defaultRequestHeaders.Accept.All(m=>m.MediaType!="application/json"))
httpClient.DefaultRequestHeaders.Accept.Add(
newMediaTypeWithQualityHeaderValue("application/json"));

defaultRequestHeaders.Authorization=newAuthenticationHeaderValue("Bearer",token);

response=await httpClient.GetAsync(
"https://localhost:5051/WeatherForecast");
}
catch(Exception ex)
{
//something went wrong
}
}


Leave a comment