


WebRTC is a free and open-source video/audio communication technology. Simply put, it allows to incorporate video conferencing solutions on web pages and in phones, without any additional software or plugins.
It is supported by giants like Google, Apple, or Mozilla, and is getting more popular. A variety of applications used by millions around the globe are built upon it and here are just some examples of them:
- Google Hangouts, Google Meet, Google Duo
- Facebook Messenger
- Discord
- Snapchat
- Microsoft Teams
Essential features:
- Low latency – in its superior form, WebRTC uses UDP sockets for media transfer. This guarantees the lowest possible latencies – even less than 500ms.
- No additional plugins. Since it is built into browsers – we don’t need any additional software to run WebRTC solutions.
- As part of the HTML5 specification – WebRTC is currently supported by most of the modern browsers: Edge 15+, Firefox 22+, Chrome 23+, Safari 11+, Opera18+ etc.
- WebRTC connection requires a secure HTTPS protocol by default.
How does it work?
While for the end-user, WebRTC based solutions are most often seamlessly integrated into a webpage, thus making it particularly easy to use, its development side is more complex.
WebRTC APIs
Let’s start with what browsers provide us with in terms of setting up a proper WebRTC connection. We do get a set of JavaScript APIs:
- MediaStream: this API is responsible for gaining access to webcams and microphones of the peer’s device.
- RTCPeerConnection: the main component of WebRTC technology. It provides codec handling, peer-to-peer communication capabilities, security, bandwidth management. It allows to set up the connection (not without intermediaries though).
- RTCDataChannel: designed to provide the possibility for bi-directional data transfer.
To set up a simple peer-to-peer connection, we would only need to use the first two APIs. The third one, RTCDataChannel, is useful only when we want to exchange additional (apart from the media) data between peers.
Signaling
Now that we know what browsers provide us with out of the box, let’s get into details of what we have to provide ourselves:
Due to its browser-based peer-to-peer nature, WebRTC requires an additional intermediate negotiator – called Signaling. The good news is that we can use any technology we like to implement it, e.g., REST or WebSockets. Take a look at the diagram:

As you can see, signaling is something that stands next to the main audio/video communication flow, but in fact, it is equally important. Its main purpose is to send the data required to initiate the connection. What exact data need to be sent by signaling? Let’s start with what could be named metadata in the world of WebRTC communication:
SDP – Session Description Protocol
This special set of data contains all the information about the type of media a peer is ready to both transmit and receive. Also includes compression codecs the endpoint is capable of decoding and IP addresses prepared to receive the incoming media stream (although this section is not mandatory because there is another mechanism for this purpose – ICE).
ICE – Internet Connectivity Establishment
This might be the trickiest part of the whole WebRTC concept. To understand why – take a look at some facts: peers will most likely be located behind some NAT (Network Address Translation) and/or firewall. This means that they won’t have public IP addresses themselves but will rather be available through some translated paths defined by the router (NAT) or that opening a direct connection simply won’t be possible (firewall).
When it comes to WebRTC, it is crucial to know under what IP addresses peers are available. So, in order to bind the connection, each peer has to first make use of the so-called ICE protocol, to find out their publicly available addresses, as well as the shortest path for media to travel between endpoints. ICE protocol achieves this with the help of two other technologies: STUN/TURN servers. Let’s take a look at the diagram to analyze the STUN scenario:

STUN server is used to allow peers to learn their public NAT IP address and port. Once the peer has those details, it can send them to the other peer through the signaling server. This scenario is more desirable because in the end media transfer will happen in a peer-to-peer manner. However, sometimes STUN server is not enough. For some network topologies, we’d need the other solution based on the TURN server:

TURN is an intermediary server that allows peers to send and receive media. We can imagine that this scenario is less desirable, as it would introduce additional latency and the TURN server itself would have to handle a lot of traffic. This might however be necessary e.g., in topologies behind symmetric NAT.
WebRTC in practice
We now have all the pieces required to set up at least a simple connection between two peers. Let’s build the solution.
Preconditions:
- client (peer) side code written in JavaScript,
- signaling server – based on WebSockets, Java/Kotlin,
- STUN/TURN server – free open source COTURN project,
- Whenever there is a field “publicIP” in the code – it is a placeholder for your public IP address. If you don’t have one, you can use your local LAN address, but then your solution will be limited to the local LAN network.
Client-side code
First, let’s define some constants:

We have a signaling server object, media constraints, STUN server url, RTCPeerConnection and two HTML video elements.
Now, we will make use of one of the WebRTC APIs provided by the browser. Handling the following events should be enough in our case:

- onicecandidate event will be called whenever ICE protocol finds an ICE candidate. Our handler will automatically send it to the other peer through the signaling server.
- ontrack is called when we receive a stream from the remote peer.
- onnegotiationended this event would be called when there is a local media device detected and acquired through the WebRTC media API.
The code for handling signaling messages looks as follows:

We distinguish two types of messages: description (for the SDP description that would come from the remote peer) and candidate for ICE Candidate objects.
And now the last piece of the client JavaScript code:

We’ve attached a handler that makes use of the WebRTC media API. This function should acquire a local camera device and initiate the connection procedure (through the onnegotiationended event).
Our HTML markup is super simple:

Signaling code
Ok, now we will take a look at how to implement a simple WebSocket-based signaling server. First, the configuration class:

And the handler bean implementation:

The handler is prepared to handle two WebSocket sessions. Any message that comes from session one is being forwarded to session two and messages from session two are being sent to session one. Methods for registering/unregistering sessions have been omitted for readability.
SSL
We can’t forget about the SSL certificates, as the WebRTC wouldn’t work for an unsecured connection. For the signaling part, for demonstration purposes it is enough to generate a self-signed certificate and store it in a .jks file. Having this, we only need to set the following properties in application.properties file:

For the client part, we need to choose a web server with HTTPS capabilities. Dockerized Nginx seems to be a perfect choice. Here is the Dockerfile:

As you can see, there is a COPY command for copying the SSL certificate and private key to the Nginx internal structures. Nginx expects SSL files (localhost.crt, localhost.key) defined in the following configuration:

Now we can finally build the image and run the container:
docker build -t nginx .
docker run -p 1234:443 nginx
Working solution
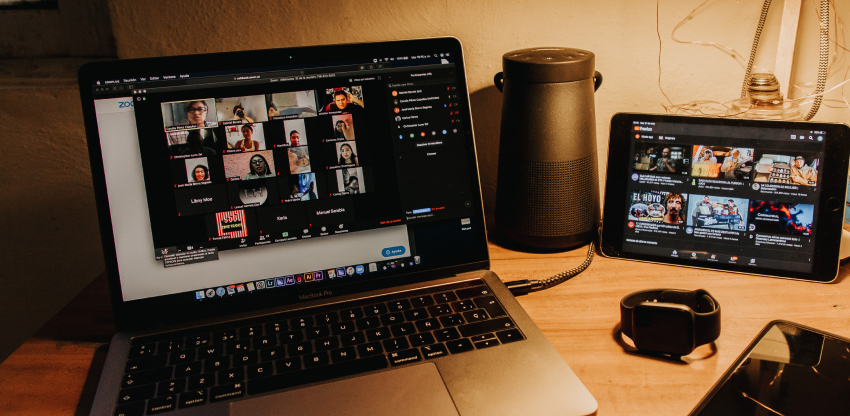
Below we have an example of the solution in practice. I’ve set up two laptops next to each other. The camera of one of them points to the stopwatch and the second one is connected through our WebRTC app.
To add some spice, i.e. to test the solution in a more real live environment, the two machines are connected to separate internet networks, and one of them is additionally proxied through the VPN server located in Portugal, which gives us roughly 2800km distance. The example is shown as a couple-seconds video, with a pause in-between, to show the actual delay:
So, as you can see, we were able to achieve a delay of around 200ms which is a great result.
Summary
In this article, we’ve learnt the basics of WebRTC technology and built a solution upon it. The fact that WebRTC is being used and supported by giants like Google or Mozilla together with the result of the code presented here, which shows excellent results when it comes to media transmission latency, proves that WebRTC should be considered one of the first choices for video conferencing solutions.


Leave a comment