In the previous article, I have described what WSL is, the main differences between the two versions, and how to install and configure the tool. Now, it is time to demonstrate how this feature can be leveraged from a development point of view. In this article, I will show you how to configure development tools like Visual Studio Code and IntelliJ IDEA to work with WSL.
Before setting up development tools, I need to explain the overall development process scenario with WSL. There are a few rules that should be followed in order to achieve the best file system performance and avoid problems in the future.
General approach
First, you need to understand how WSL can be incorporated into daily development work and what its role is. To begin with, source code (also repository configurations), Docker containers, databases, and application servers, among other things, will be stored or run under a WSL Linux distribution.
On the other hand, on the Windows OS, development tools like IDEs, code editors, and web browsers are installed. The key point here is that these tools will connect with the WSL Linux distribution, enabling “remote” work on the code (edition and debugging).
In order to maintain the best performance across file systems (since Windows and Linux use completely different ones), it is strongly advised to store all the project files within one specific operating system.
Dev tools configuration
Having explained the general approach to the development process and file storage, let’s configure tools like Visual Studio Code and IntelliJ IDEA. As I mentioned earlier, those tools need to be installed on Windows OS first, so for the next steps, I will assume that this has already been done as it is a completely standard procedure.
Remember to check the Add to PATH option while installing Visual Studio Code to easily open a folder in WSL using the code command.
Visual Studio Code configuration
Integration of Visual Studio Code with WSL is straightforward. After the installation process, the Remote Development plugin needs to be installed.
For some Linux distributions, it may also be necessary to install wget and ca-certificates. This is not the case in Ubuntu, but if you chose a different distribution, in your WSL Linux OS, execute the following commands (assuming it is a Debian, or Debian-based distribution; if not, use the appropriate package manager):
sudo apt update && sudo apt install -y wget ca-certificates
Opening a project
To open a project stored in a WSL Linux distribution, you can use Windows Terminal to navigate to the project location and open the whole directory in Visual Studio Code by executing the following command:
code .
Alternatively, you can open Visual Studio Code on your Windows OS first and use the command palette (ctrl+shift+p) to type wsl to open a directory in WSL. Once the directory is opened, you can work with it as you would with any usual files on Windows. Please note that in the lower-left corner, you will have an indicator showing that you are connected to WSL:

Troubleshooting – VS Code seems to be blurry
I believe it is not a WSL issue itself, but for sure it is worth mentioning. Some users may encounter a strange problem with VS Code, where it appears as a blurry image. If this is
the case, check which graphics processor is being used for this program. If it is Nvidia, you may need to disable FXAA for this application. Check this thread on Stack Overflow for more information.
Extensions
Some extensions need to be installed only on the Windows OS, while others require installation both on Windows and in the WSL Linux distribution. You can easily identify the latter in Extensions explorer panel as they are marked with the comment Install in WSL, like the ones below:

Simply click the blue Install in WSL button for those extensions, and from that point on, the extension should also work for source code in WSL.
Documentation
In general, Visual Studio Code is now configured, at least in a basic sense, and can be used with WSL. Traditionally, I would recommend to at least take a brief look at official documentation available here.
IntelliJ IDEA configuration
Unlike Visual Studio Code, no extensions are needed to work with WSL. Once IntelliJ is installed, you can create a new project in the WSL Linux distribution, and it is also possible to open an existing project from WSL.
For the steps described below, I assume that Java SDK and Maven are already installed in the WSL Linux distribution. If not, I would recommend using a tool called SDKMAN! – you can visit the project page for installation and usage instructions.
Creating a new project in WSL
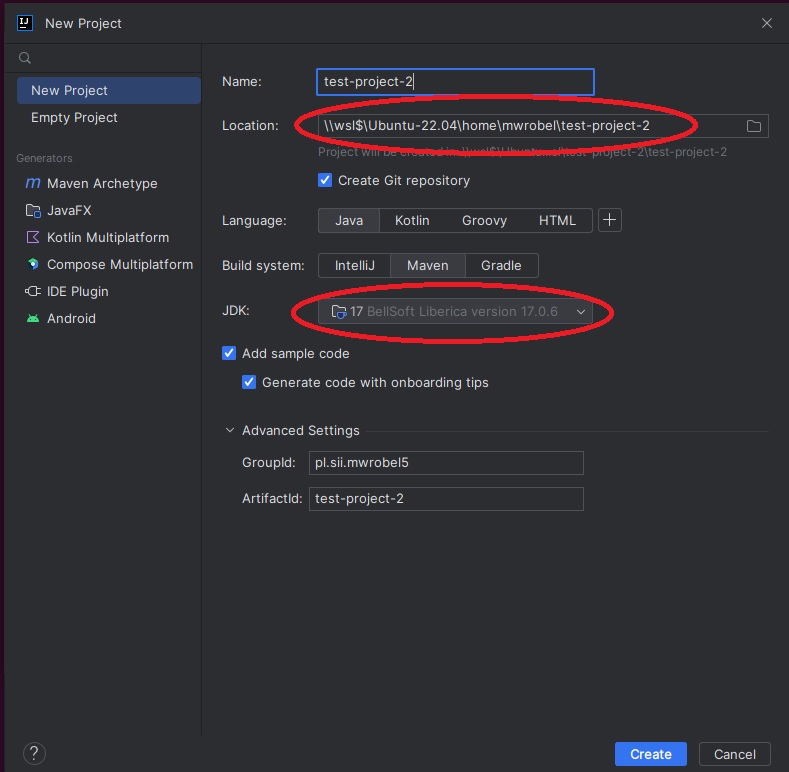
To create a new project in the WSL, open IntelliJ and click on New Project. Let’s create an empty Maven Java 17 project. To do so, you can check the following parameters:

Take a look at Location and JDK. Location starts with:
\\wsl$\Ubuntu-22.04\
This path points to the WSL Linux file system.
\home\mwrobel\test-project-2
This is a standard Linux path, where:
- home is a standard Linux directory (it can be even a separate partition) for Linux users,
- mwrobel is a directory for Linux user (account) mwrobel,
- test-project-2 is a project directory name.
The next thing to mention is the JDK. The one shown in the picture is not installed on Windows but was earlier installed on Linux. IntelliJ can automatically detect the JDK, and if there is no JDK installed on Windows, it selects the one installed in WSL Linux.
The last step is to click the blue Create button and wait while all the libraries are indexed.
Opening an existing project in WSL
Click the Open button on the Welcome screen. Similar to creating a new project, you need to point to the location in WSL Linux. For example:
\\wsl$\Ubuntu-22.04\home\mwrobel\test-project-2
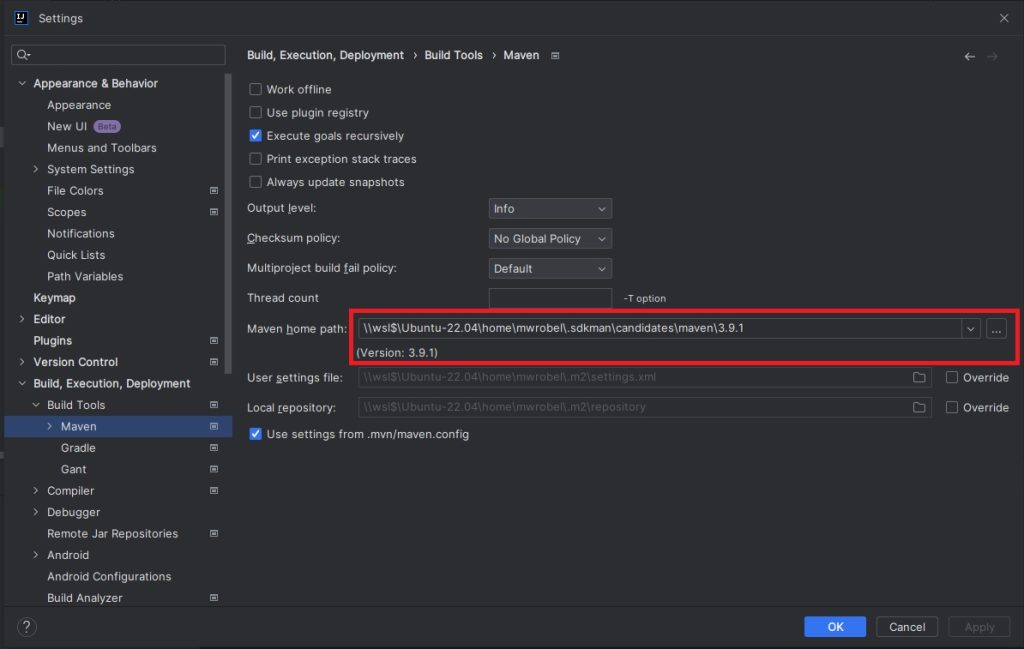
Update Maven home path in IntelliJ
In order to set WSL Maven path, do as follows:

Running application from IntelliJ and debugging
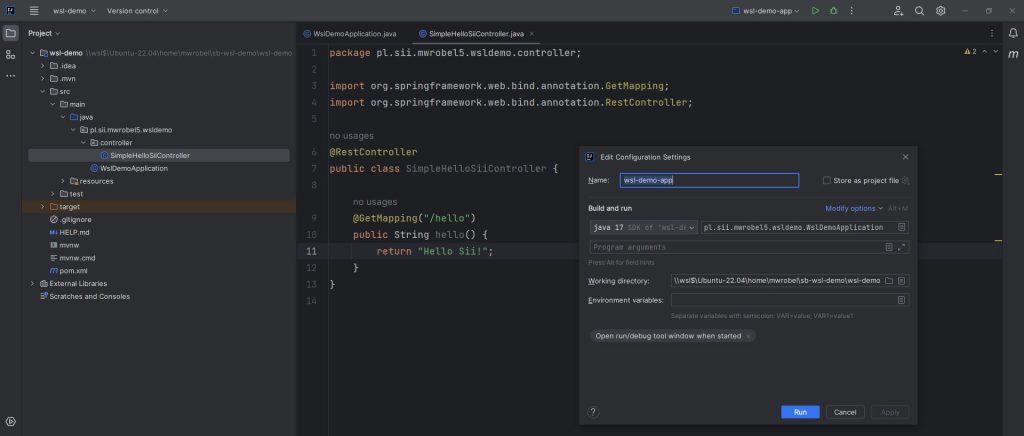
If you use build tools like Maven or Gradle, you can build and run applications from the terminal using appropriate commands or scripts. However, you may also want to be able to run applications directly from IntelliJ or debug them. To make this possible, IntelliJ needs to connect with the Linux virtual machine. This requires configurating Windows firewall to allow access for IntelliJ for certain types of connections. Unfortunately, if you are using a corporate PC, you may not be able to change these settings by yourself. In this scenario, you would need to contact system administrator.
For the sake of this example, let’s assume there is a very simple Spring Boot app with one single “hello world” GET REST endpoint. The project has already been imported into IntelliJ.

When you try to run application from IntelliJ, you may encounter the following error:

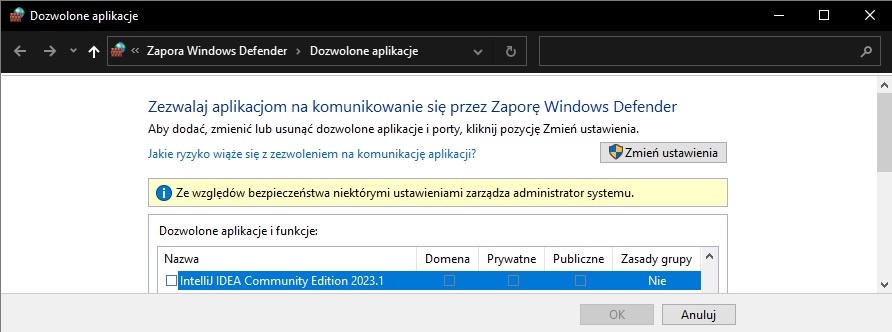
You need to configure the Windows firewall to enable communication between IntelliJ and the Linux VM. Please check your firewall settings.

Check the checkboxes for the current network connection, especially for the public network. Once IntelliJ has access through the Windows firewall, it should be possible to run applications from this IDE and connect with a debugger.
Additional information
I recommend checking the official JetBrains documentation on how to configure IntelliJ. They also mention some firewall rules configuration that may need to be prepared.
GIT is installed by default in Ubuntu distribution. The only basic configuration part at the beginning is to set user and e-mail.
Using the executed application
Last but not least, how can we check if the application is running and behaving properly (let’s set aside the topic of all kinds of automated tests for now 😉)? We would like to execute and manually test the application.
Assuming that application was executed on the Linux WSL machine, on port 8080, you can simply open a web browser on Windows and enter the following address:
localhost:8080
That’s all. Ports between Windows and Linux WSL are mapped, so the experience is as if you were using Windows machine only. For the Spring Boot application scenario described above, the result is as follows:

Conclusion
In this article, I showed how to configure and use certain development tools with WSL, and I also explained the general approach for the development process. In the next article, I will present how to configure and use Docker.
Sources
- Working across Windows and Linux file systems
- Install VS Code and the WSL extension
- Visual Studio Code Remote Development Extension Pack
- Visual studio code looks blurry
- Get started using Visual Studio Code with Windows Subsystem for Linux
- The Software Development Kit Manager
- WSL
***
Other articles in the series can be found here:


Leave a comment