In a digitized world, using a technological tool for effective management skills is becoming crucial. Following the development of new technology, companies, and enterprises have decided to introduce innovative solutions that improve operational processes and open new possibilities for adapting to changes in market conditions.
Microsoft Power Platform is one of the best tools in this area. This advanced solution allows:
- automation of business processes
- creating applications
- data analysis
To fully utilize the Power Platform’s potential, it is necessary to understand its operational aspects.
In the article, I’ll focus on crucial configuration aspects within the Power Platform, going step by step through configuration with you. I’ll examine why the right configuration is essential to safely and efficiently Power Platform. I’ll also share some tips and tricks to use the application admin panel potential fully.
The first steps toward configuration
Each preparation of a new environment within the Power Platform should be preceded by careful analysis. Before creating the environment, it is worth considering some basic questions. Answers will impact the effectiveness and adjust the configuration to the needs of our organization.
Preliminary analysis
- Goal and purpose of the environment: Do we plan to create a single environment (e.g., Center Of Excellence) for administrators and related tasks? Or do we need a configuration adapted to implementations of greater complexity, capable of handling extensive process-supported applications (ALM) (this solution may require the creation of three separate environments: development, test, and production)?
- Availability of the Dataverse Database Capacity[1]: Does our organization have sufficient Dataverse database capacity in its tenant[2] to create a new environment?
- Access management: Do we want access to the environment to be fully controlled using Azure Active Directory/Microsoft Entra ID[3], or do we plan independent configurations (in most cases, however, we want access to be managed in one place)?
- Data Loss Prevention Policies: Does our environment require Data Loss Prevention policies[4], and how should they be configured?
Configuration scenario
For this article, we will assume a more complex configuration scenario.
- We will focus on creating a configuration used in professional implementations, including three separate environments: development, testing, and production.
- Access control will occur within the Azure Active Directory/Microsoft Entra ID service.
- The ALM process will be implemented using the Solutions mechanism [5], in which changes will be introduced manually (there is an option to automate this process, but this topic is beyond the scope of this article).
To better understand all the elements that make up this configuration, I will present the described scenario in the form of a diagram:
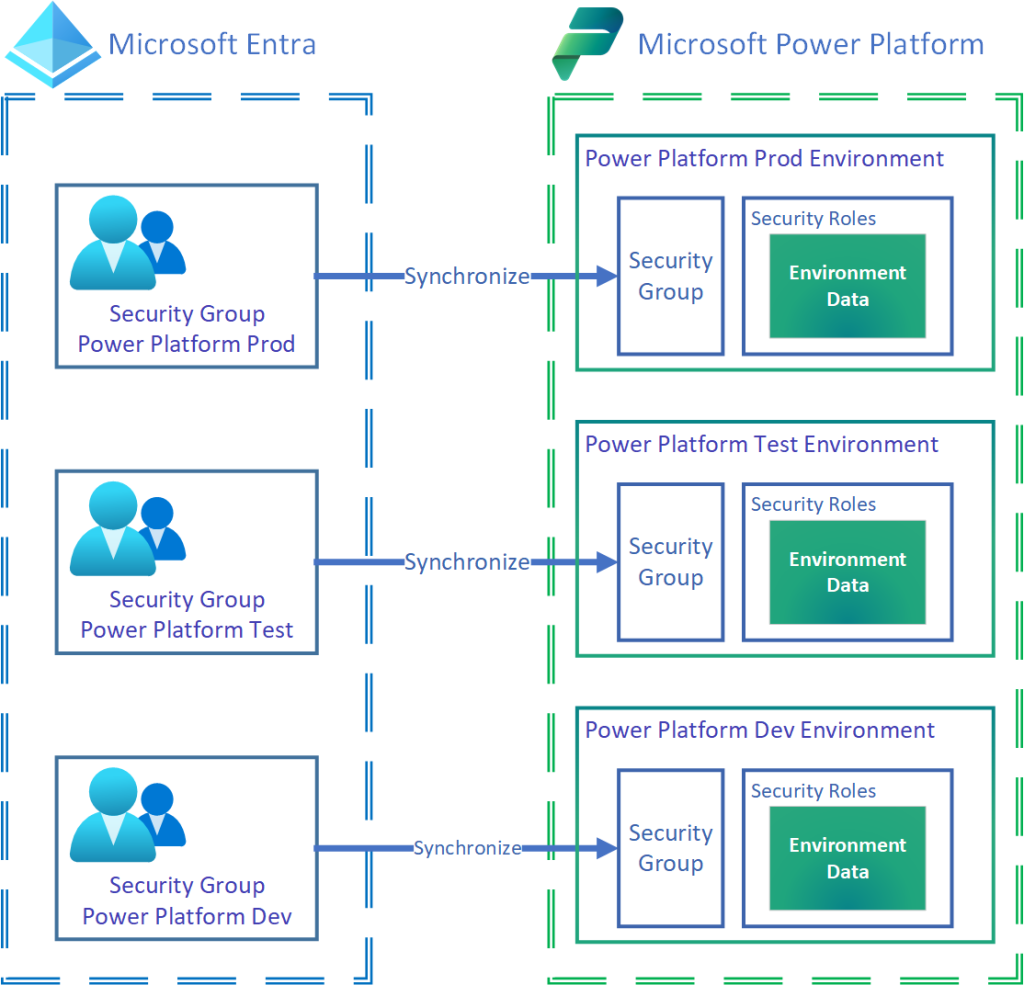
Security group configuration on the Microsoft Entra ID side
We will start the environment configuration process with the appropriate preparation of Microsoft Entra and the creation of appropriate Security Groups. Their synchronization between Power Platform and Microsoft Entra will allow you to manage access to the environment entirely from Microsoft Entra.
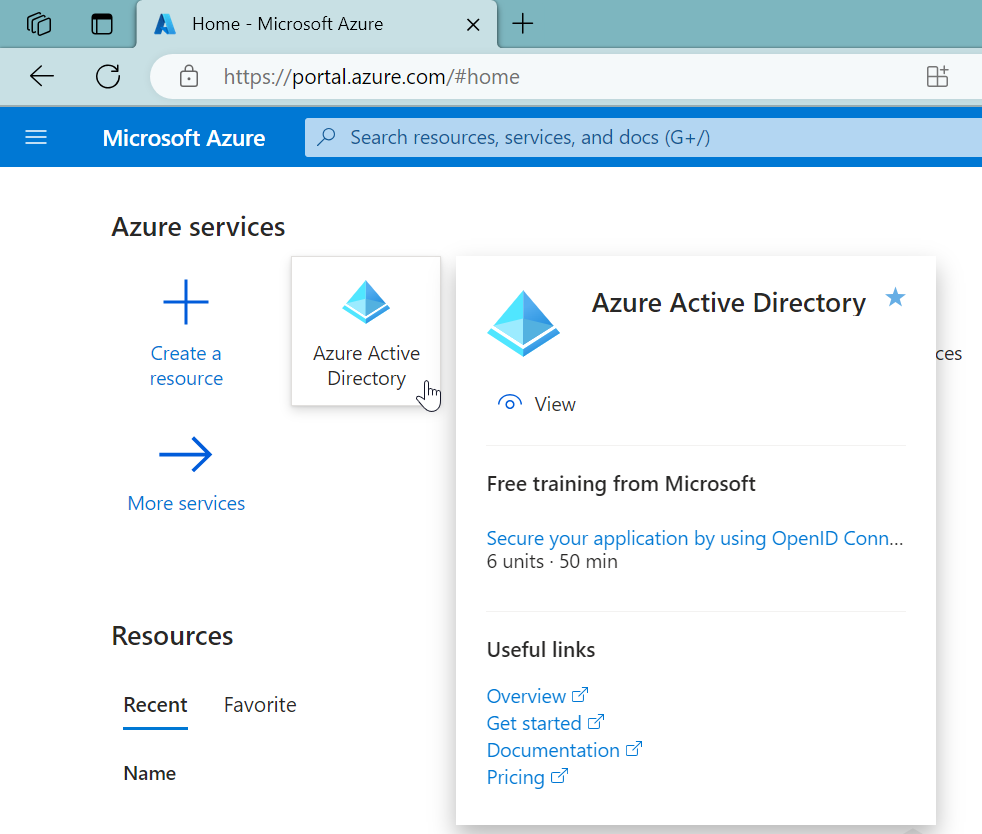
- We start by logging in to the Azure portal. We select the Azure Active Directory section.
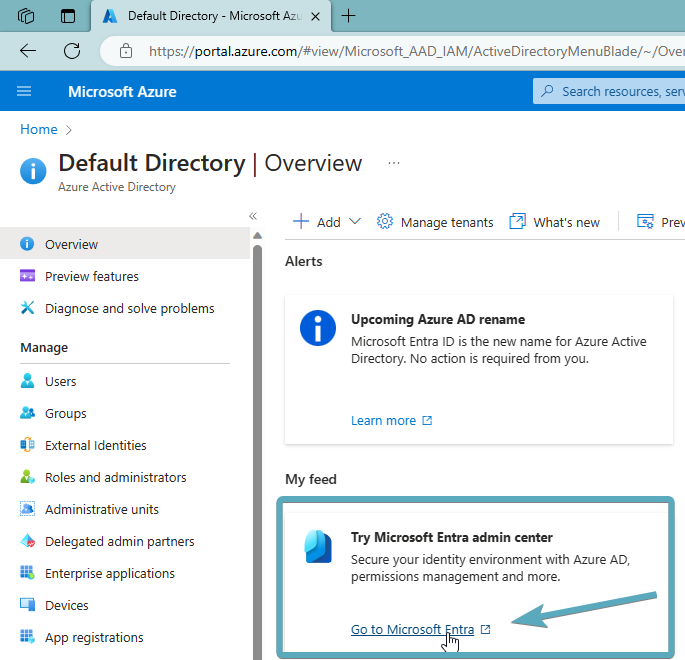
- Due to the upcoming modifications in the area of Azure Active Directory, which include the transformation into Microsoft Entra, we will perform configuration in a new interface – Microsoft Entra Admin Center. To access it, go to the Overview section under My Feed (alternatively, we can open it via a direct URL: Home – Microsoft Entra admin center)
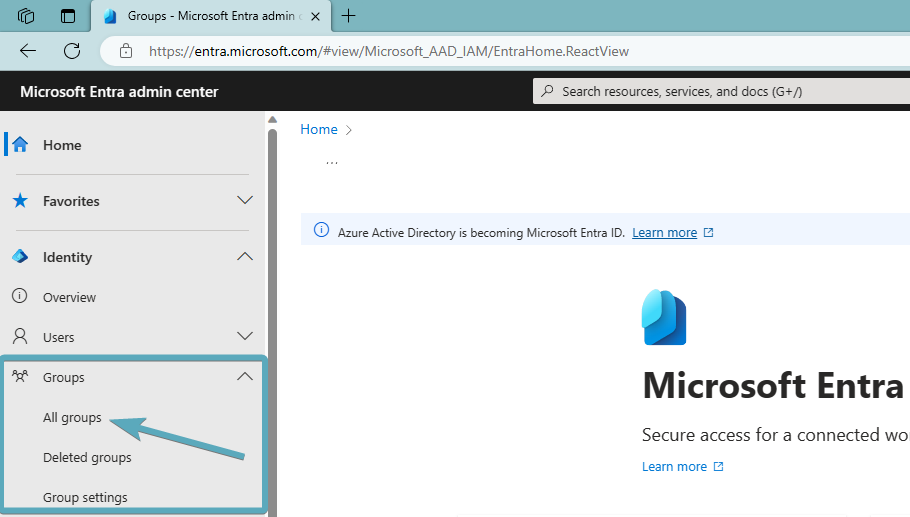
- Choose: „Group” and „All Groups” from the menu on the left side.
- Click the „New group” button
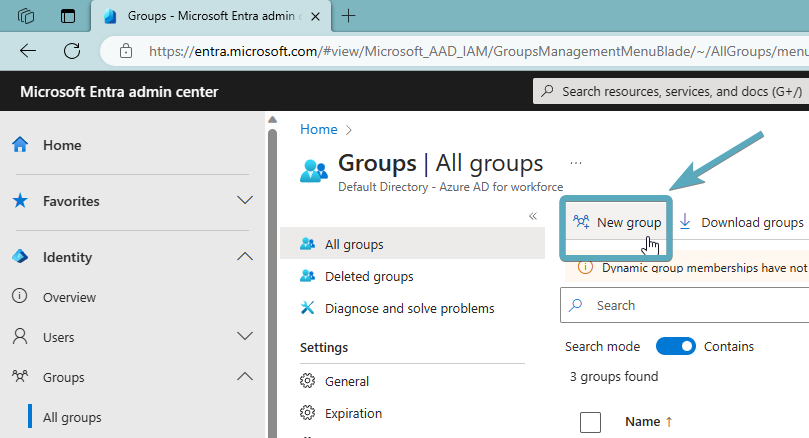
- Fulfill the details of the new group on the Azure Portal. Here is an example configuration:
- Group type – Security,
- Group name – Security Group Power Platform Dev,
- Group description – Developer environment security group,
- Membership type – Assigned,
- Owners – indicates the person who is to be the owner of the group,
- Members – indicates people who are to be members of the group. After further configuration, group members will have access to the environment (access to the environment does not mean access to data and operations performed on the environment; this is a separate configuration not covered in this article).
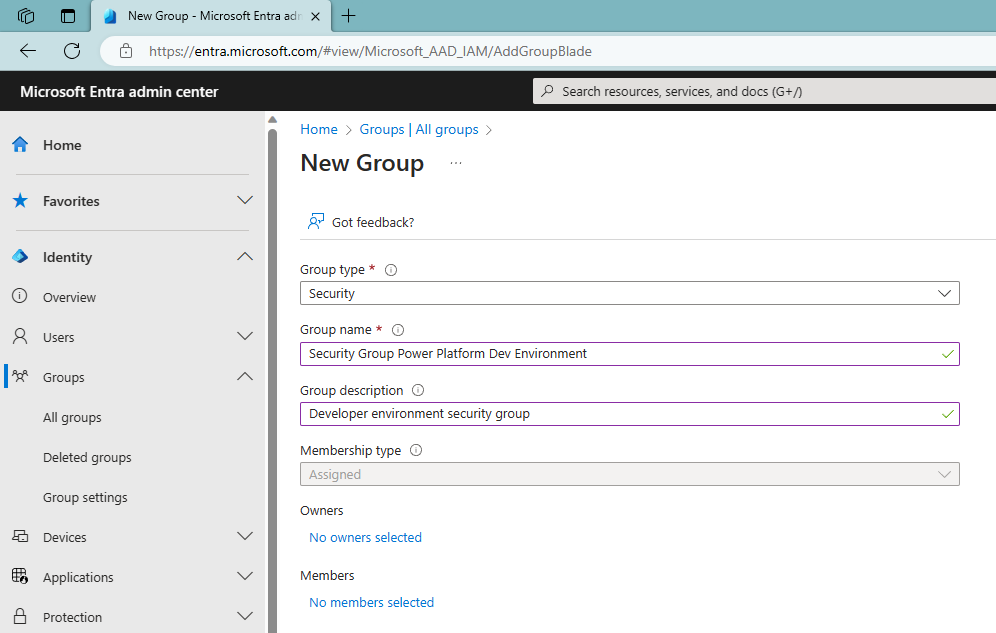
- Continue with steps 2 to 4, repeating these steps until we reach three distinct groups: Dev, Test, and Production. The table below shows the full sample configuration that can be used:
| Configuration | Dev Security Group | Test Security Group | Prod Security Group |
| Group type | Security | Security | Security |
| Group name | Security Group Power Platform Dev Environment | Security Group Power Platform Test Environment | Security Group Power Platform Prod Environment |
| Group description | Developer environment security group | Test environment security group | Production environment security group |
| Membership type | Assigned | Assigned | Assigned |
| Owners | Any user, according to company policy | Any user, according to company policy | Any user, according to company policy |
| Members | Any user who is to have access to the environment in question | Any user who is to have access to the environment in question | Any user who is to have access to the environment in question |
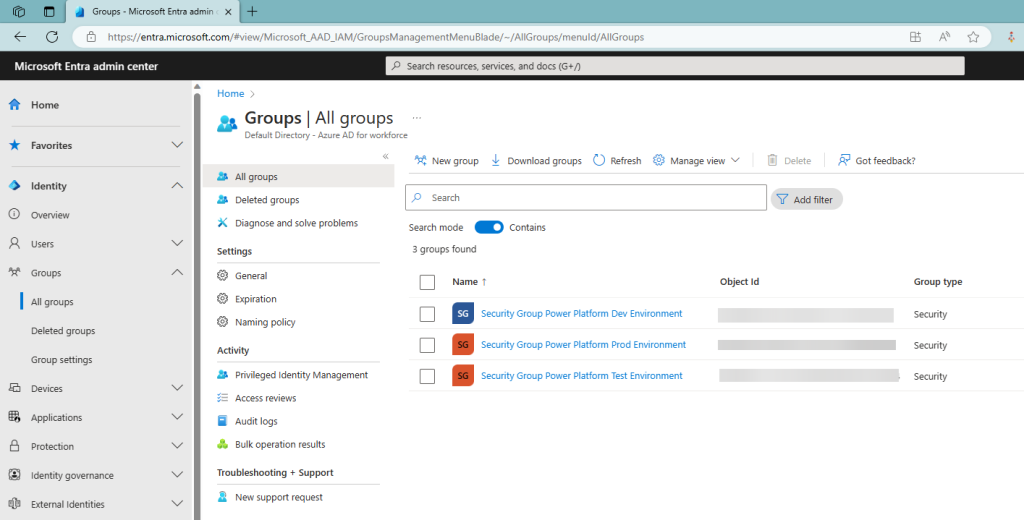
Now, with a properly configured Security Group, we can start configuring environments within the Power Platform.
Configuration of environments on the Power Platform side
The Power Platform Admin Center tool manages environments within the Power Platform. Although Microsoft offers many methods to get there, the quickest way is to use the Power Platform admin center direct URL link (microsoft.com).
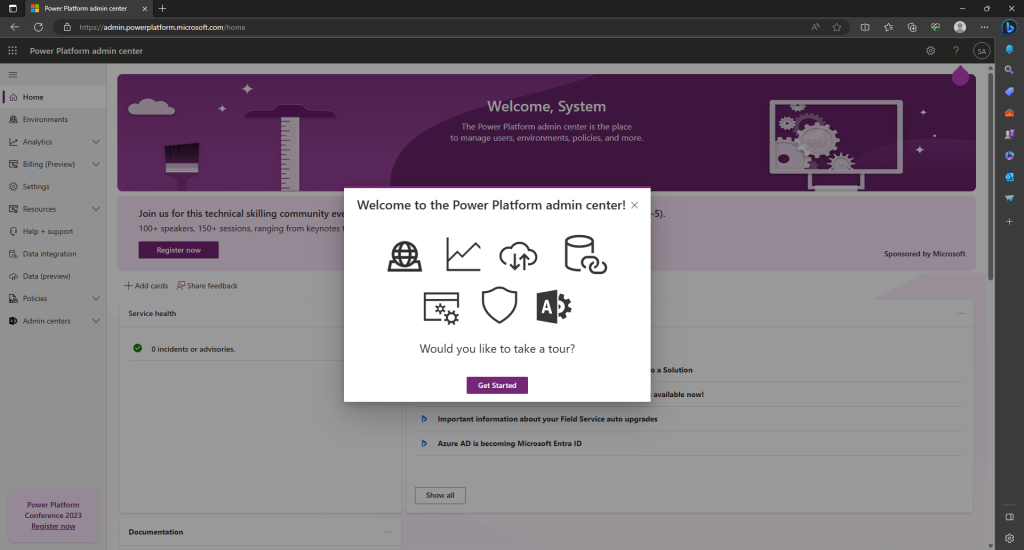
When you launch this admin center, you will receive a welcome message and an invitation to a short virtual orientation “journey.” I encourage you to participate in this “journey” because it will give you a better understanding of the importance and application of the main navigation elements.
New environment
I assume that we have already completed the above-mentioned virtual journey. At this point, we can fully focus on creating a new environment.
The first step is to ensure we have enough capacity in the “Capacity Database” to create a new environment with the Dataverse database. We are required to have at least 1GB of free database memory. To verify the available capacity, go to the “Resources” section and then to the “Capacity” subsection. This is where a report presenting the available memory usage will be presented.
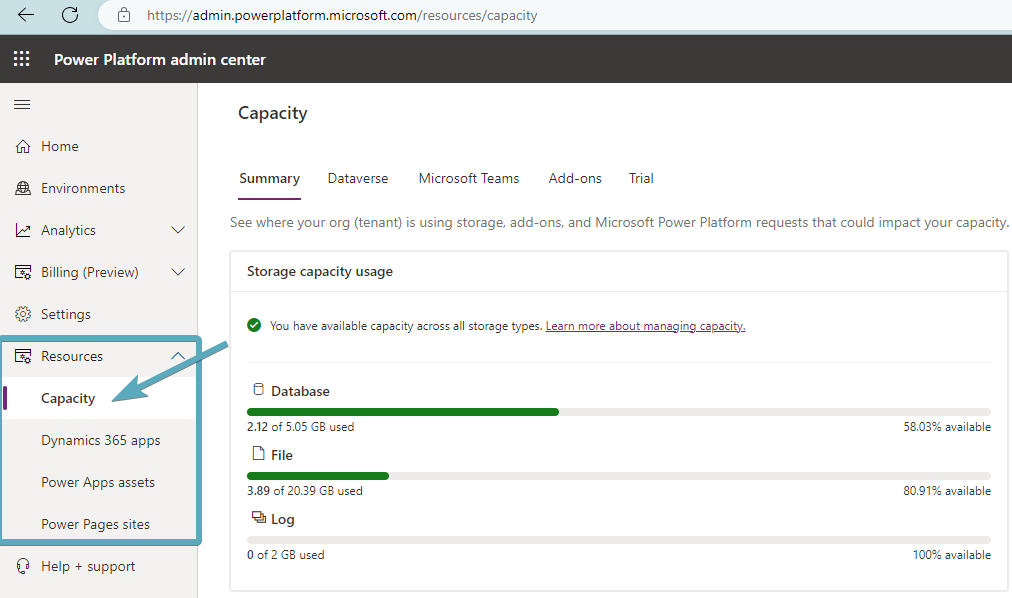
In a situation where it turns out that we do not have enough capacity, there are two things we can do:
- Freeing up space under current licenses. The official Microsoft documentation describes the database cleanup options: Free up storage space – Power Platform | Microsoft Learn.
- Purchasing a license that will increase “Database Capacity”. In most cases, we must choose between purchasing a dedicated “Dataverse Capacity Add On” license or expanding the number of user licenses. To make the right choice, it is worth reading the licensing guide from Microsoft: Licensing Overview for Microsoft Power Platform – Power Platform | Microsoft Learn.
However, in the configuration discussed in this article, we have enough space to create a new environment.
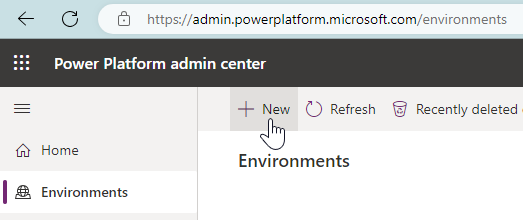
The next step will be to go to the Environment section, where we can start creating the environment by pressing the ‘+ New’ button.
Then, a new window will open on the left side of the interface, in which we will start entering the environment parameters.
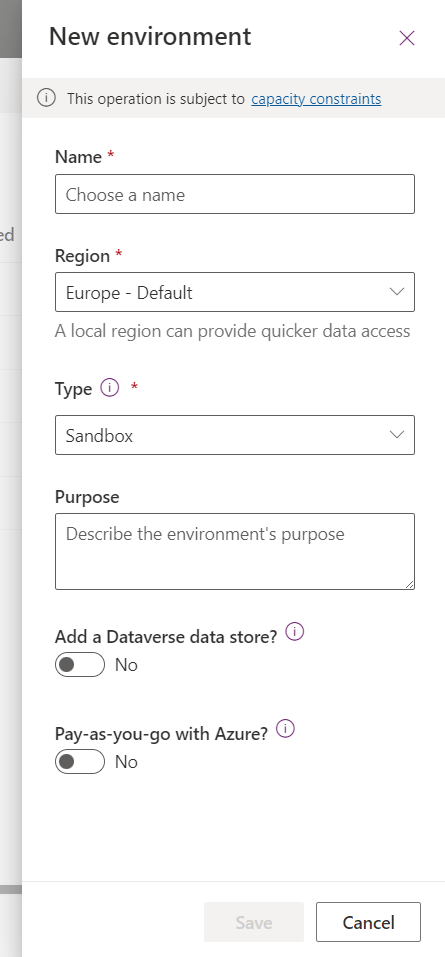
Creating a new environment consists of two steps. Once you have finished filling in the first window and pressing the “Save” button, you will be taken to the second window.
Important! Clicking “Save” in the first step does not yet lead to creating a new environment. In the table below, we will analyze each point that must be completed during this process in detail.
| Setting | Description | Is it possible to change this setting in the future? |
| Name | A name of the environment that users will understand. It plays an important role because it will be visible in different contexts to administrators and those working on application development in this environment. | Yes |
| Region | Region setting determines which Azure regions will store resources related to the environment. It’s worth mentioning that this setting is not precise because the location of the Power Platform region does not necessarily align with the location of the Azure region[6]. As a result, there may be problems with built-in integrations with Azure services, such as Azure Synapse[7]. To determine the region for your deployment, it is recommended to review available documentation: Regions overview for Power Automate – Power Automate | Microsoft Learn | Yes – ticket to Microsoft support required: Geo to geo migrations – Power Platform | Microsoft Learn |
| Type | Type affects various background processes, such as resource constraints in the environment. For example, development environments do not consume Dataverse Capacity. However, they have certain limitations, such as the number of users, the amount of memory consumed, or the number of Power Automate runs[8]. Typesetting also determines whether the environment will expire after a certain period (trial environments expire after 30 days[9]). | Not always. It is possible to change the type of environment according to Microsoft’s limitations. The most common cases are Sandbox -> Production or Production -> Sandbox. Other cases should be considered by Microsoft documentation: Environments overview – Power Platform | Microsoft Learn |
| Purpose | A text box that allows administrators to add a brief description of the environment. | Yes |
| Add a Dataverse data store? | This setting determines whether we want to create a Dataverse database for our environment. Usually, we will choose to add it. For situations where you don’t need a database, see Why create an environment without a database. | You can add a database in the future. However, the operation can’t be undone, and the only way to delete the database is to delete the entire environment. |
| Pay-as-you-go with Azure? | This setting is used to determine how the environment is licensed. Currently, we have two options to choose from: Licensing according to the organization’s currently owned licenses, which means that the organization must have previously purchased licenses to use specific services. Pay-As-You-go – means that the environment monitors its ongoing consumption and issues the fee based on the outcome. You can find more information about this here: Pay-as-you-go plan overview – Power Platform | Microsoft Learn | Yes |
| Language | Specifies the default language of the environment. It is possible to install additional languages such as Polish, Ukrainian, Czech, German, English, and many other supported languages[10]. Additional languages can be installed at any time. However, the default language can be only set once. This is important because this language will be the default for system customizations. Many elements in the system depend on this setting (e.g., the interface language in the old admin panels); this may be important while working in international teams or for easier cooperation with the Microsoft support team. The default language will also be the default option for users – they will be able to change it in their settings[11]; administrators will also be able to change it using the XRMToolBox User Settings Utility[12]). They are considering the need for support and development of the system by various teams and units, and setting English as default is recommended. This decision helps while trying to get support from the Microsoft team; it also eliminates language barriers during the development process. For example, choosing English will significantly improve communication with Microsoft partners outside of Poland, which could speed up cooperation. | No |
| Currency | Defines the base currency for the environment. The system enables support for different currencies, and adding additional currencies is always possible. However, the currency selection made at this step becomes the base currency. This means the system will automatically change currency-related fields into the currency we set as the default[13]. Because of this automation, a base currency is typically based on the one used for reporting financial data. The choice of currency should be preceded by an analysis of other financial reports and confirmation from business users as to which currency can be considered the base currency. | No |
| Security Group | Defines which Security Group users must be assigned to to be granted permission to access the environment[14]. | Yes |
| URL | Specifies an environment-related URL fragment that is part of the entire URL. Example of full URL template for the European region: https://[URL].crm4.dynamics.com/ If you set the URL to: ‘ContosoDev,’ the final URL will look like this: ContosoDev.crm4.dynamics.com. In addition, the URL will change depending on the region selected[15]. | Yes |
| Enable Dynamics 365 Apps? | Defines whether the environment will be able to install Dynamics 365 applications. Note that as of 16.08.2023, there was an option to activate this feature even if you did not have a license for Dynamics 365 applications. To avoid future limitations, it is better to enable this option. | No |
| Automatically deploy these apps? | Defines which Dynamics 365 apps (especially CRM/Customer Engagement apps) will be added to the Power Platform environment. You must purchase adequate licenses for specific applications to add them at this stage. | We can install the apps anytime, provided we own appropriate licenses. |
| Deploy sample apps and data? | Defines whether sample applications and data will be uploaded when the environment is created. Please note that as of 16.08.2023, enabling this option installs three Model-Driven apps. For more information, see Model-driven sample apps – Power Apps | Microsoft Learn | Yes, you can install the same applications from make.powerapps.com or install only the sample data after creating the environment: Add or remove sample data – Power Platform | Microsoft Learn |
By understanding the implications of the choices made in the options above, we can proceed to personalize the configuration of our environments. In the next table, you can see the parameters that apply to our environments:
| Setting | Development Environment | Testing Environment | Production Environment |
| Name | Power Platform Dev Environment | Power Platform Test Environment | Power Platform Prod Environment |
| Region | Europe | Europe | Europe |
| Type | Sandbox | Sandbox | Production |
| Purpose | Development environment to discuss the process of creating environments and ALMs | Test/UAT environment to discuss the process of creating environments and ALMs | Production environment to discuss the process of creating environments and ALMs |
| Add a Dataverse data store? | Yes | Yes | Yes |
| Pay-as-you-go with Azure? | No | No | No |
| Language | English | English | English |
| Currency | PLN | PLN | PLN |
| Security Group | Security Group Power Platform Dev | Security Group Power Platform Test | Security Group Power Platform Prod |
| URL | We can enter our unique URL or allow the system to generate one automatically. | We can enter our unique URL or allow the system to generate one automatically. | We can enter our unique URL or allow the system to generate one automatically. |
| Enable Dynamics 365 Apps? | Yes | Yes | Yes |
| Automatically deploy these apps. | None | None | None |
| Deploy sample apps and data? | No (if we choose ‘Enable Dynamics 365 Apps’, this option will be automatically hidden) | No (if we choose ‘Enable Dynamics 365 Apps’, this option will be automatically hidden) | No (if we choose ‘Enable Dynamics 365 Apps’, this option will be automatically hidden) |
The final configuration should look like this:

Once the configuration is complete, we can start working in our environments. Please note the Security Group controls that access to the environment. Users must first be assigned to the appropriate groups to access the environment. It is also important to remember that access to an environment does not automatically grant access to applications and data. This is done by Security Roles, which can be assigned to individual users or teams.
Summary and next steps
In this article, we focused on the process of creating environments. It is worth noting that the scope of administrative activities is much broader than the configuration described above. However, we now have a solid basis for further actions. By gaining knowledge in subsequent areas, we can use configuration possibilities more effectively and manage our environments more efficiently. I encourage you to explore the next steps and possibilities on your own with the Microsoft documentation: Microsoft Power Platform admin documentation – Power Platform | Microsoft Learn
***
[1] More about Dataverse Database Capacity: New Microsoft Dataverse storage capacity – Power Platform | Microsoft Learn
[2] Tenant definition: Define Azure Active Directory tenants – Cloud Adoption Framework | Microsoft Learn
[3] Because of the recent service name change from Azure Active Directory to Microsoft Entra, in the next parts of this article, I will be using a newer version – Microsoft Entra. However, in the attached screenshots, you might still notice the name Azure Active Directory Azure AD is Becoming Microsoft Entra ID – Microsoft Community Hub & New name for Azure Active Directory – Microsoft Entra | Microsoft Learn & Azure AD is being renamed to Microsoft Entra ID | Microsoft Entra Identity Developer Blog
[4] More about Data Loss Prevention: Data loss prevention policies – Power Platform | Microsoft Learn
[5] Documentation on solutions: Solutions in Power Apps – Power Apps | Microsoft Learn
[6] To verify this aspect, it is necessary to compare Azure Regions Choose the Right Azure Region for You | Microsoft Azure with Power Platform Regions overview for Power Automate – Power Automate | Microsoft Learn. The second documentation shows that the Power Platform Region comprises a few Azure Regions.
[7] The problem is caused by the situation in which Power Platform resources and additional services are stored in different Azure regions. For, the Azure Synapse Link documentation (Create an Azure Synapse Link for Dataverse with Azure Data Lake – Power Apps | Microsoft Learn) says that both Power Platform and Synapse resources must be in the same region, meaning that when choosing Power Platform in European region our resources can be inserted in North Europe or West Europe (which we cannot modify from the Power Platform Admin Center). Before moving to the next steps, we should always check which Azure Regions our Power Platform environments were implemented in.
[8] More about development environments: About the Power Apps Developer Plan – Power Platform | Microsoft Learn
[9] More about trial environments: About trial environments: standard and subscription-based – Power Platform | Microsoft Learn
[10] A list of all standard languages is available here: Microsoft Dataverse language collations – Power Platform | Microsoft Learn
[11] Documentation on personal options: Set personal options – Power Apps | Microsoft Learn
[12] Link to the tool: User Settings Utility · XrmToolBox
[13] More about Power Platform currency system: Manage transactions with multiple currencies – Power Platform | Microsoft Learn & Transaction Currency (currency) table (Microsoft Dataverse) – Power Apps | Microsoft Learn
[14] More about Security Groups: Control user access to environments: security groups and licenses – Power Platform | Microsoft Learn
[15] More about URL and region dependency: Power Platform and Dynamics 365 datacenter regions – Power Platform | Microsoft Learn




Leave a comment